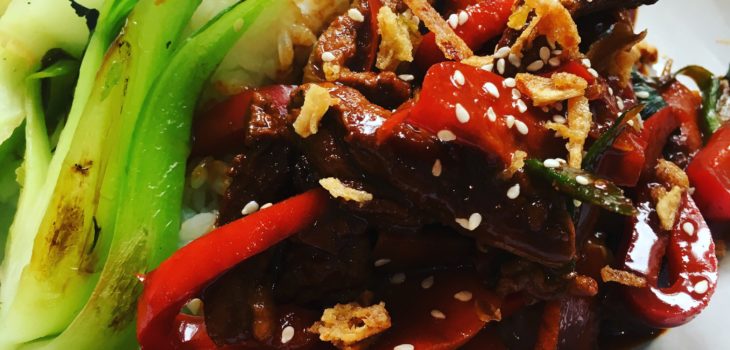
Skip to content
The Food Wife logo
  • Home
  • About
  • Blog
  • Contact
Site Search

Spicy Korean Beef

  • 15th June 201818th June 2018
  • by thefoodwife

Serves 2-3

I have sung the praises of beef skirt previously in my Chinese Ginger Beef recipe and I use it here again, this time with a Korean vibe. The star of the show today however is the spicy fermented Korean paste, gochujang, which has featured in my Korean Chicken Wings and one of my Asian Pork Belly and the Instant Pot recipes.

I love the stuff and keep a tub of it in my fridge at all times (and a spare in the cupboard!). A friend recently noticed it and asked what it was, musing that the contents of my fridge were intriguing. The thing is, she hadn’t looked in my cupboards! I have friends who make a point of rummaging through them whenever they come over, as they know I’ll have weird and wonderful things inside them.

If you are in the vicinity of an Asian supermarket or food shop I’d recommend picking up a tub. It’ll keep a long while in the fridge but that won’t be an issue anyway as you’re sure to become addicted to its intense heat and be using it at every opportunity.

  • Ingredients:
  • Oil for stir-frying
  • 300g beef skirt steak (or steak of your choice), cut in to thin strips
  • 1 heaped tbsp gochujang
  • 1 1/2 tbsp dark soy sauce
  • 1 1/2 tbsp rice wine vinegar
  • 1 tbsp sugar
  • A couple of drops of sesame oil
  • 1 carrot, peeled and cut diagonally in to thin pieces
  • 1/2 red pepper, cut into strips
  • 2 spring onion, cut on the diagonal

Step 1: Combine the gochujang, soy sauce, vinegar, sugar and sesame oil in a cup or bowl to make a sauce (don’t worry if it’s lumpy at this stage, this will sort itself out in the wok).

Step 2: Heat the oil in a wok on a high heat and add the beef; cook for two minutes, stirring all the time.

Step 3: Add the vegetables and stir fry for another minute.

Step 4: Add the sauce and stir for a couple of minutes and then serve.

Serve with rice and pak choi. I also like to sprinkle the dish with a few sesame seeds and some ready-fried crispy onions, but this is by no means obligatory.

Meatballs

  • 26th April 201827th April 2018
  • by thefoodwife

Serves 6

What carnivore doesn’t love a good meatball? There is something so comforting about a big plate of pasta coated in a rich and spicy tomato sauce studded with succulent meaty morsels.

I’ve made many different types over the years and have learned a few things I’d like to share. A meatball made of only lean meat is too dry. A combination of meats is the way to go. Baking them before adding to the sauce results in a far tastier end product. And the addition of fennel seeds to the tomato sauce just makes it all the more delicious and, well, Italian.

My most recent meat combination has been half pork stuffing (heavily laden with herbs) and half lean mince meat. I’ve tried this recipe with lean (5% fat) beef mince and also lean ostrich mince. It may sound like a strange meat to use, but I would really recommend giving it a try. It’s incredibly lean and high in protein. This, coupled with the fattier pork, results in a really tasty meatball. But don’t worry, if I haven’t convinced you, beef is nearly just as good.

  • Ingredients:
  • The meatballs:
  • 300g lean mince e.g beef or ostrich
  • 340g herby pork stuffing mix/sausage meat (ensure this is without gluten if you are making it gluten free)
  • The sauce:
  • 2 tbsp olive oil
  • 2 red onions, diced
  • 4 cloves garlic, minced
  • 1 red pepper, diced
  • 4 tsp fennel seeds
  • 2 tsp chilli flakes (optional)
  • 1 litre passata
  • 2 tsp balsamic vinegar
  • Salt and pepper to taste
  • To serve:
  • 500g Pasta (gluten free if necessary)
  • Parmesan (leave this out if you are making it dairy free)
  • Fresh basil

Step 1: Start by making your meatballs by simply combining the two meats in a bowl and mixing well (although messy you’ll get the best results by using your hands, which are going to get messy in the next step anyway!)

Step 2: Roll small amounts of the mix between your two hands to make balls (the mix will make about 35 small balls although you can make them bigger if you wish).

Step 3: Place the balls on a baking tray and put in a preheated oven at 200c for 25 minutes (bear in mind if you make bigger balls they’ll take longer).

Step 4: Whilst the meatballs are cooking, make your sauce. On a medium heat, add your oil to a pan and your red onion, garlic and red pepper. Soften for 3-4 minutes, stirring every so often, to make sure the garlic and onion do not burn. Add your fennel seeds and chilli flakes (if using) and stir for a minute or two, before adding your passata and balsamic vinegar. Season to taste. Cook the sauce on a low heat for 10-15 minutes. Whilst this is simmering cook your pasta according to the packet instructions.

Step 5: Remove your meatballs from the oven and add to your sauce.

Step 6: When you are ready to serve, add cooked pasta to the sauce and coat evenly. Use some of the pasta cooking water to loosen if necessary.

Step 7: To serve, sprinkle Parmesan and torn fresh basil leaves over the pasta and meatballs.

These meatballs freeze well; freeze them separately to the sauce once they have been baked in the oven. They can be defrosted and then added to a sauce to heat through whilst the pasta is cooking.

Chinese Beef with Ginger

  • 21st April 20186th August 2018
  • by thefoodwife

Serves 2-3

One of the first things I learned to cook as a child was Sweet and Sour Chicken. Granted, it was initially a jar of Uncle Ben’s, but I soon progressed to making my own sauce from scratch with the help of my mum’s cookbooks. My mum really encouraged my cooking (after all it meant I was happy to prepare and cook for my brothers and sister!) although she wasn’t so keen on the mess I’d leave behind. Nowadays I’m a much tidier cook, helped of course by the fact I’m the one who has to clean up!

Fast forward 25 years and I appreciate something with a bit more flavour; don’t get me wrong, I still love sweet and sour, but this is punchier and sticky from the cornflour and scant sauce. I always make this with beef skirt, it’s a cheaper cut but flavoursome, and suits being cut into thin strips, but you could use a steak of your choice. I include a chilli as I like the heat, but it’s not essential, and you’ll still get a bit of fire from the ginger. I prefer dark soy sauce in this dish, for both colour and flavour, and it also helps contribute to the stickiness. The garnishes are by no means obligatory, by all means use just one or two, or even none.

Now, this beef dish is so quick to cook – once you start it in the wok it’ll be ready to serve in about five minutes, so the key is preparation. Have everything ready to go (it should only take about 10 minutes to prepare) and then follow my steps in quick succession and hey presto, dinner is ready!

  • Ingredients:
  • 2 inch piece of ginger, peeled and finely diced
  • 2 cloves of garlic, peeled and finely diced
  • 1 chilli (optional), finely diced
  • 2 medium carrots or 1 large carrot, peeled and sliced thinly on the diagonal
  • 3 spring onions sliced diagonally
  • 250g beef skirt cut into thin strips
  • 2 tbsp dark soy sauce
  • 1 tbsp rice wine vinegar
  • 1 tsp sugar
  • 1 tsp sesame oil
  • 2 tbsp oil
  • 1 heaped tbsp corn flour
  • To garnish (optional):
  • Coriander leaves
  • Sesame seeds
  • Crispy onions (I buy ones ready fried)

Step 1: Prepare all of the ingredients so you are ready to cook. Once you start it’ll be ready in about five minutes!

Step 2: Heat 2 tbsp of oil on a high heat in a wok.

Step 3: Add the meat and quickly stir to avoid it from sticking.

Step 4: Add the cornflour and stir to coat the oily beef.

Step 5: Add the garlic, ginger and chilli (if using) and stir.

Step 6: Add the spring onion and carrot and then stir.

Step 7: Add the sugar, dark soy sauce, rice wine vinegar and sesame oil, then stir so everything is coated.

Step 8: Stir fry for 2-3 minutes, by which time the meat should be cooked through and the vegetables al dente.

Serve with rice (I like to use sticky sushi rice) and add the garnishes, if you are using. I would also recommmend a few prawn crackers on the side.

Quesadillas

  • 19th April 201822nd April 2018
  • by thefoodwife

Makes 4 small/2 large

I love Mexican food. It’s so fresh and zingy with spices. One of my favourites to batch cook is the Jamie Oliver recipe ‘Chilli con Jamie’ which is sweet, smoky and deep with the flavour of chillis, enhanced by coffee. It is slow cooked with chunks of beef that are then shredded into the sauce, and it makes for a much more satisfying chilli than one made with mince.

This evening we were going to have fajitas but I decided to mix things up and so decided we’d have quesadillas. I decided to make my own fajita spice mix, but you could always use one from a shop. I made my quesadillas with free range pork, but they would be good with free range chicken or beef too. Likewise, if you wanted to try a veggie version, why not replace the meat with some roasted diced butternut squash or sweet potato; their natural sweetness will go well with the spicy seasoning.

  • Ingredients:
  • 1 tbsp oil
  • 1 onion, small dice
  • 1 pepper, small dice
  • 300g meat (e.g. pork/chicken/beef) cut in to 1/2 cm dice
  • 1 portion of fajita spice mix
  • Juice of 1/2 a lime
  • 2 tbsp chopped coriander
  • 8 small wraps/4 large wraps
  • 200g grated cheese that is good for melting e.g. mozzarella
  • Oil for frying e.g. Frylight

Step 1: In a frying pan on a medium heat, add the oil, onion and peppers and fry for about 10 minutes, stirring occasionally until they are softened and browned slightly.

Step 2: Whilst these fry, combine the fajita spice mix and the diced meat in a bowl and stir to ensure that the meat is evenly coated.

Step 3: Increase the heat and add the meat, fry for 5 minutes, stirring occasionally to ensure all sides of the meat are being cooked.

Step 4: Add the juice of half a lime and cook for a further couple of minutes to allow the meat to finish cooking through, and to evaporate the moisture to leave a dry mix.

Step 5: Remove from the heat and stir through the chopped coriander.

Step 6: Place a separate, non stick frying pan on a medium heat and spray with Frylight or wipe a small amount of oil on the pan. Place 1 small tortilla wrap in the pan, and top with about 1/8 of the cheese, followed by 1/4 of the cooked meat mixture, another 1/8 of the cheese and finally another wrap. Use a fish slice to press the quesadilla down and cook for 1-2 minutes until the bottom layer of cheese has begun to melt and the bottom wrap should have crisped up and turned golden brown. Spray the top wrap with a little more oil and then use the fish slice to flip the quesadilla and cook for a further 1-2 minutes on the other side. Turn the quesadilla out and keep warm whilst you repeat the process with the remaining wraps and mixture.

I would serve two of these (small) quesadillas per adult for a main meal, served with a salad (try mixing lettuce, spring onion, avocado, chopped jalapeños from a jar, and dress with the juice from the remaining lime and a little olive oil).

Posts navigation

1 2 3

Newsletter

Follow The Food Wife

Facebook
Twitter
Instagram

Blog Search

Blog Categories

  • Alcohol 7
  • Baby Weaning 24
  • Baking 43
  • Beef 14
  • Cake 25
  • Chicken 24
  • Christmas 1
  • Cocktails 4
  • Dairy-Free 130
  • Dessert 10
  • Fish 4
  • Gluten-Free 136
  • Instant Pot 10
  • Lamb 4
  • Ostrich 1
  • Pescatarian 5
  • Pork 19
  • Rabbit 1
  • Shellfish 6
  • Turkey 4
  • Uncategorised 4
  • Vegan 80
  • Vegetarian 141
Theme by Colorlib Powered by WordPress