Skip to content
The Food Wife logo
  • Home
  • About
  • Blog
  • Contact

Author: thefoodwife

Turkey Pho

  • 7th December 20197th December 2019
  • by thefoodwife

Serves 2

Here’s a little something different to try with your leftovers this Christmas.  Utilising your leftover meat and stock, you can create a light but filling Vietnamese soup.   

Ingredients for the broth:

1 L turkey stock

25g sugar (I used coconut sugar)

10 star anise

1 black cardamom 

2 large pieces of cinnamon or cassia bark

1 tsp fennel seeds

1 tsp coriander seeds

1 tsp black peppercorns 

4 cloves

1 tsp salt

2 tbsp fish sauce

For the bowls:

100g pho noodles (I used flat rice noodles) cooked (by soaking in boiled water for a few minutes)

2 handfuls of beansprouts

1 pak choi, shredded into 1/2 cm pieces

1 red chilli, finely sliced

2 spring onions, finely sliced

2 small handfuls of cooked turkey meat, shredded/roughly chopped (I used the dark meat)

Coriander and basil, roughly chopped

1/2 lime

Step 1: Place all the ingredients for the broth (except the fish sauce) in a lidded sauce pan and simmer for 1 1/2 hours. (You can either put all the aromats in a muslin or be prepared to sieve these out at the end).

Step 2: Add the fish sauce and check seasoning. Add ground pepper and sugar as required.

Step 3: In each serving bowl place the cooked noodles followed by the spring onion, chilli, bean sprouts, pak choi, turkey and herbs.

Step 4: When ready to serve either remove the muslin, or sieve out the aromats before ladling the broth over everything in the bowls. Serve with a wedge of lime.

Pork and Pear Stuffing

  • 28th November 2019
  • by thefoodwife

Serves 8

I often get more enthusiastic about the stuffing in a roast dinner than anything else on the plate; we had this last year for our Christmas dinner and it was my highlight of the meal!

Trade your bog-standard sage and onion stuffing balls from a packet for this and you won’t be disappointed! Using a ready made sausage meat means you have a good ratio of fat to meat and it is already seasoned. If it is not seasoned then you’ll want to add a pinch of salt also. 

Now I don’t stuff my stuffing, instead I bake it in an oven proof dish (covered with foil for the first 25 minutes) and once cooked it is then sliced into portions (I will always have more than one!) and makes an excellent addition to a sandwich if there is any leftover.

Ingredients:

400g sausage meat (gluten-free if required)

10 sage leaves, finely chopped

Handful of parsley, finely chopped

2 dried pears, finely chopped (or use a handful of dried apple or apricots, finely chopped) 

2 handfuls of breadcrumbs (gluten-free if required)

Zest of 1 unwaxed lemon

Pinch of pepper 

Step 1: Combine all ingredients in a large bowl.  Using your hands is messy but works best. 

Step 2: Transfer to a greased baking dish and use the back of a spoon to smooth over the surface.

Step 3: Cover with foil and bake in the oven at 180c for 45 minutes (Remove the foil after 25 minutes).

Jaffa Cheesecake

  • 9th October 2019
  • by thefoodwife

Serves 12

Here is a cheesecake recipe inspired by the classic jaffa cake. There are several steps to this and its best to start it the night before you intend to eat it in order to ensure the jelly layer is fully set.  

For an added citrus hit you could stir a tablespoon of marmalade into the jelly when it is still liquid.  And if you want to make it a bit boozy use an orange liqueur to taste, in place of the orange extract.

I’ve included some tips to help you if things don’t quite go to plan (they should save you from any disasters, but if worst comes to worst it’ll still taste good!) 

I made this gluten-free by using appropriate biscuits. 

Ingredients:

For the base:

200g digestive biscuits, crushed to resemble bread crumbs (gluten-free if required)

75g butter, melted 

For the cheesecake filling:

150g best dark chocolate (minimum 60% cocoa solids) 

500g mascarpone (bring out of the fridge 20 minutes before using)

200ml double cream (bring out of the fridge 20 minutes before using)

100g icing sugar

2 tsp orange extract

For the orange jelly:

135g orange flavoured jelly block, cut into small pieces 

Boiling water

For the ganache topping:

100g best dark chocolate (minimum 60% cocoa solids) 

100ml double cream

Step 1: Start the night before by making the jelly disc. Melt the jelly in boiling water (make up to 300ml – although if you want a thinner layer of jelly try 225ml) and then pour in to an 8 inch cake tin lined with clingfilm.  Allow to set, by transferring to the fridge once cooled.

Step 2: The next day, make the base by mixing the digestive biscuits with the butter until combined and then press in to the base of a nine-inch spring release cake tin. Level out with the back of a spoon and put in the fridge for at least 20 minutes to set.

Step 3: Begin to prepare the filling by carefully melting the dark chocolate in a bowl over simmering water. Ensure the base of the bowl does not touch the water, nor should any liquid go in to the chocolate otherwise it will seize up and you will have to start again. Once melted, remove the bowl from the heat and allow to cool.

Step 4: Whist the chocolate is cooling, in a separate bowl, sieve the icing sugar and add the double cream and orange extract. Whisk until it forms stiff peaks.

Step 5: Only once the chocolate has cooled but still liquid (this is very important as you do not want the chocolate to seize up) beat in the mascarpone cheese using a spoon or whisk. Mix until smooth and combined evenly.  If the mix does seize up (it will remain pale coloured and have tiny flecks of solid chocolate through it) sieve in two tablespoons of cocoa powder and beat until smooth.

Step 6: Gently fold in the orange cream mixture until smooth.

Step 7: Spread evenly over the set biscuit base, loosely cover and return to the fridge to set.

Step 8: To make the ganache topping, break the remaining dark chocolate into small pieces and place in a bowl.  Heat the remaining cream until just boiling and then pour over chocolate.  Leave to rest for a couple of minutes and then stir; the chocolate should melt into the cream and begin to thicken as it cools. (If the ganache splits, try adding a little bit of warm milk and whisking until smooth.  You can eat the ganache split it just isn’t as aesthetically pleasing!)

Step 9: Carefully transfer the jelly disk onto the top of the cheesecake.  Once the ganache is cool, spread evenly over the jelly and cheesecake top and return to the fridge to fully set (about an hour).  

Once ready to serve, carefully remove from the tin but allow to be out of the fridge for 20 minutes to soften slightly before serving. 

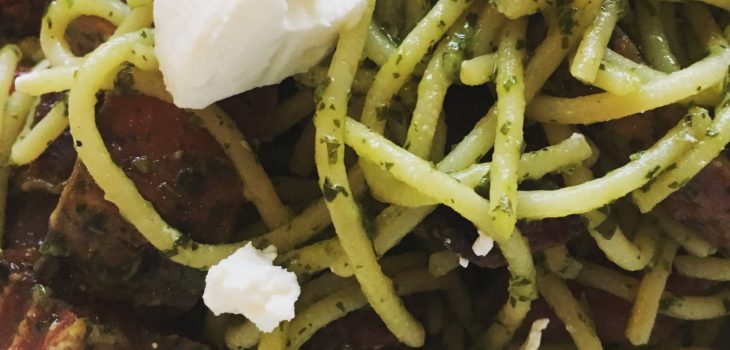
Roasted Beetroot, Pesto and Goats Cheese Spaghetti

  • 24th September 2019
  • by thefoodwife

Beetroot is in abundance at the moment. We have plenty at our allotment, lots of it is the beautiful chioggia, psychedelic with its pink and white stripes.  I love to roast it and here it stars in a pasta dish. 

You can make it easier by using a shop bought pesto but I love pairing this with my wild garlic pesto (I have tiny pots, enough for two people) in my freezer.  

The soft goats cheese brings a lovely creamy element to the dish and works wonderfully well with the goats cheese.

Ingredients:

1 large beetroot per person, peeled and cut into 1 inch chunks

1 dsp pesto per person (shop bought or try my homemade versions)

30g soft goats cheese per person

75g spaghetti (gluten-free if required) per person

Oil

Salt and pepper

Step 1: Begin by roasting the beetroot. Toss the prepared chunks in a little oil (cold-pressed rapeseed or olive is perfect) along with a pinch each of salt and pepper.  Spread on a baking sheet and roast in a preheated oven (170c fan) for 35-45 minutes until tender. 

Step 2: Cook the spaghetti according to the packet instructions and then drain.

Step 3: Stir a dessert spoon of pesto per person through the drained spaghetti and add the roasted beetroot.

Step 4: Serve on individual plates with the soft goats cheese on the top (I use a teaspoon to put several several dollops of the cheese over the top). 

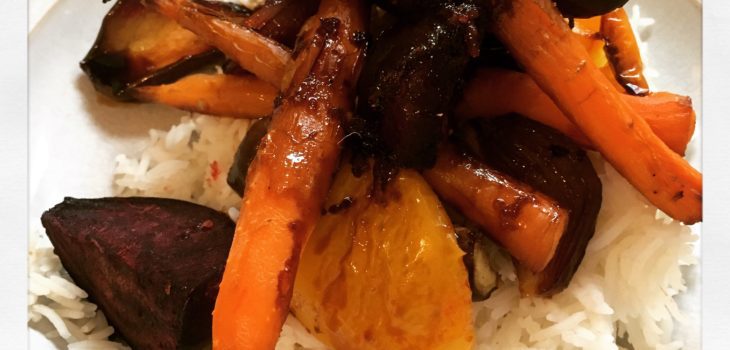
Soy and Ginger Roasted Vegetables

  • 12th September 2019
  • by thefoodwife

Serves 3

Our allotment is yielding aubergines, beetroot, peppers and carrots at the moment.  They are also in plentiful supply in the supermarkets and so here is a gluten-free, vegan meal using this bounty that even satisfied my meat-loving husband. 

Helpful hint! Once you have tossed the vegetables in the glaze, ensure you lift them out of the bowl and on to your baking tray to keep the left over marinade to turn into your sticky glaze for drizzling at the end.

If I had had them I would have finished the roasted vegetables off by sprinkling over a few sesame seeds.

N.b. We had a portion of the vegetables left over and so I had them for lunch the next day, warmed up in the microwave and then stuffed inside a wrap. 

Ingredients:

For the sticky glaze:

2 inches of root ginger, peeled and grated

3 tbsp soy sauce (gluten-free if required)

3 tbsp maple syrup 

1 tsp sesame oil

Pepper

For the roasted vegetables:

2 red onions, peeled and quartered

1 large pepper, deserted and cut into 2 inch pieces

1 small aubergine, cut into 2 inch strips

3 or 4 small-medium beetroot cleaned and quartered.

10 small carrots, cleaned

To serve: 225g basmati rice, cooked according to the instructions

Step 1: Combine the ginger, soy, syrup, sesame oil and a pinch of ground pepper in a large bowl.

Step 2: Toss the prepared vegetables in the dressing and then spread on a baking sheet.  Keep back the dressing remaining in the bowl and transfer to a small sauce pan.

Step 3: Roast the tray of vegetables in a preheated oven at 170c (fan) for 45 minutes.

Step 4: Five minutes before the vegetables are ready, put  the saucepan of left over marinade on a medium heat and reduce slightly so it becomes sticky.

Step 5: Serve the roasted vegetable on a bed of basmati rice, with the reduced glaze drizzled on top.

Posts pagination

Previous page 1 … 35 36 37 38 39 … 68 Next page

Newsletter

Blog Search

Blog Categories

  • Air fryer 2
  • Alcohol 12
  • Baby Weaning 24
  • Baking 74
  • Beef 18
  • Bread 1
  • Brunch 7
  • Cake 47
  • Chicken 48
  • Christmas 14
  • Cocktails 9
  • Dairy-Free 228
  • Dessert 37
  • Duck 1
  • Fish 12
  • Gluten-Free 254
  • Instant Pot 19
  • Lamb 6
  • Lunch box fillers 2
  • Ostrich 1
  • Pasta 4
  • Pescatarian 13
  • Pork 38
  • Rabbit 1
  • Salad 9
  • Shellfish 10
  • Soup 1
  • Turkey 10
  • Uncategorised 6
  • Vegan 136
  • Vegetarian 243

Socials

  • Facebook
  • Twitter
  • Google
  • Linkedin
  • Instagram
  • Pinterest
  • Youtube
Theme by Colorlib Powered by WordPress
Back to top
imunify-bot-check