Skip to content
The Food Wife logo
  • Home
  • About
  • Blog
  • Contact

Author: thefoodwife

Pasta with Roasted Beetroot, a Walnut Pesto and Ricotta

  • 22nd August 201824th August 2018
  • by thefoodwife

Serves 3-4

I’m so pleased with this invention I had to share it with you. This was the vegetarian pasta dish I served at an Italian-themed dinner party recently. I was serving an ox cheek ragù to the meat eaters and wanted a dish that could stand up to it.

Roasting the beetroot gives it a beautiful sweetness to complement its earthiness. The soft ricotta gives bursts of creaminess whilst the walnut pesto lightly coats the pasta and brings everything together.

Whist this is a vegetarian dish, it can easily be made vegan by omitting the cheese elements, and gluten-free by using suitable pasta. You can roast the beetroot and make the pesto ahead of time, so you only need a short amount of time to cook the pasta and bring the dish together just before serving (step 5 onwards).

I’d not served a pink pasta dish before, but it went down well! Even the carnivores wanted to try some!

  • Ingredients:
  • For the roasted beetroot:
  • 1 tbsp oil (olive or rapeseed are best)
  • 4 beetroot, topped and tailed, cleaned, halved and cut in to wedges (8-10 per beetroot)
  • 1 sprig of rosemary, finely chopped
  • Pinch each of salt and pepper
  • For the walnut pesto:
  • 6 tbsp olive oil
  • 75g walnuts, toasted
  • 75g pecorino or parmesan, crumbled/roughly chopped
  • 1-2 cloves of garlic, peeled
  • Pinch each of salt and pepper
  • For the pasta dish:
  • 300g spaghetti
  • Oil
  • 150g ricotta
  • Parmesan/pecorino

Step 1: Toss the ingredients for the roasted beetroot together (be careful as your fingers may stain pink!) and spread on a baking sheet (I lined mine with baking parchment as I wanted to stop the beetroot from sticking).

Step 2: Roast in a preheated oven at 180c for 50-60 minutes.

Step 3: Remove and leave to one side.

Step 4: Make the pesto (you can do this whilst the beetroot is roasting). Combine all the ingredients in a food processor or pestle and mortar and blitz/pound together. This will make more than you need (I froze the extra in little pots). I used two cloves of garlic and on tasting it had a real heat from the raw garlic, but this mellows in the cooking stage.

Step 5: Cook your pasta according to the packet instructions.

Step 6: Heat a frying pan on a medium-low heat. Add some oil (olive or rapeseed are best) and about half of the pesto and the roasted beetroot. Stir frequently for a couple of minutes.

Step 7: Add the drained pasta (reserving a little of the cooking water) and toss together, adding a little cooking water to loosen as required.

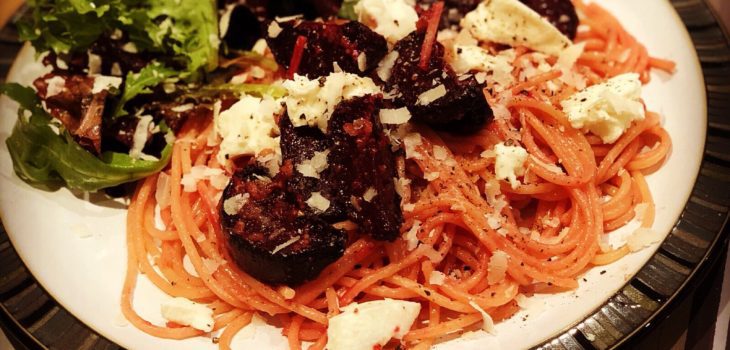
Step 8: Serve with the fresh ricotta (use a teaspoon to drop little pieces over the pasta) and offer grated parmesan or pecorino at the table.


The Food Wife’s Chocolate and Amaretto Italian Cheesecake

  • 20th August 201826th August 2018
  • by thefoodwife

Serves 8-12

A totally indulgent dessert which is rich with chocolate and mascarpone and spiked with the beautifully almondy amaretto. If you want a non-alcoholic version then you can of course omit the liqueur from the filling; you’ll still get a delightful hit of almond from the amaretto biscuit base. If you are making this gluten-free omit the Ferrero Rocher decoration.

This is a non-bake cheesecake, so it needs time in the fridge to firm up. It needs three sessions in the fridge so make sure you allow enough time. Either make it the day before or the morning of the evening you intend to serve it. You need about three hours for the filling to fully set before you add the ganache which then needs an hour in the fridge.

I was serving this at the end of an Italian-themed dinner party. If you’d like to do the same look out for my ox cheek ragù and roasted beetroot and walnut pesto with ricotta for main course ideas.

You will need a loose-bottomed cake tin; I used one with an unclippable outer ring.

  • Ingredients:
  • For the base:
  • 160g amaretti biscuits, crushed to resemble bread crumbs
  • 50g butter, melted
  • For the cheesecake filling:
  • 150g best dark chocolate (minimum 60% cocoa solids)
  • 500g mascarpone
  • 200ml double cream
  • 100g icing sugar
  • 50ml amaretto liqueur
  • For the ganache topping:
  • 100g best dark chocolate (minimum 60% cocoa solids)
  • 100ml double cream
  • Optional decoration:
  • 9 Ferrero Rocher (leave out if making this gluten-free)
  • Cocoa powder

Step 1: Make the base by mixing the amaretti biscuits with the butter until combined and then press into the base of the tin. Level out with the back of a spoon and put in the fridge for at least 20 minutes to set.

Step 2: Begin to prepare the filling by carefully melting the dark chocolate in a bowl over simmering water. Ensure the base of the bowl does not touch the water, nor should any liquid go in to the chocolate otherwise it will seize up and you will have to start again. Once melted, remove the bowl from the heat and allow to cool.

Step 3: Whilst the chocolate is cooling, sieve the icing sugar in a separate bowl and add the double cream. Whisk until it forms stiff peaks then add the amaretto liqueur and fold in (or whisk very gently) until combined.

Step 4: Only once the chocolate has cooled but is still liquid (this is very important as you do not want the chocolate to seize up), beat in the mascarpone cheese using a spoon or whisk. Mix until smooth and evenly combined.

Step 5: Gently fold in the cream mixture until smooth.

Step 6: Spread evenly over the set biscuit base, loosely cover and return to the fridge to set for at least three hours.

Step 7: To make the ganache topping, break the remaining dark chocolate into small pieces and place in a bowl. Heat the remaining cream until just boiling and then pour into a bowl and add the chocolate. Leave to rest for a couple of minutes and then stir; the chocolate should melt into the cream and begin to thicken as it cools. (If the ganache splits, try adding a little bit of warm milk and whisking until smooth. You can eat the ganache split, it just isn’t as aesthetically pleasing!)

Step 8: Once cool, spread evenly over the set cheesecake and return to the fridge to fully set (about an hour). If you would like, arrange some unwrapped Ferrero Rocher on the top and sift a little cocoa powder over the top.

Step 9: Once ready to serve, carefully remove from the tin. You may need to run a pallet knife around the edge before removing.

Baby Weaning Sugar-Free Blueberry Compote

  • 17th August 201820th August 2018
  • by thefoodwife

This is a versatile recipe to make for your little one and the whole family. Use it stirred through full fat Greek yogurt (as beautifully demonstrated by The Food Baby in the picture), dolloped on top of porridge, rice pudding or baked semolina, or drizzle it over fluffy pancakes or ice cream. It’s a fun way to get fruit into their diet and it’s got no added sugar, relying on the natural sweetness of the fruit.

  • Ingredients:
  • 1 punnet of blueberries
  • 1 tsp lemon juice
  • 1 tsp cornflour, slackened in a little cold water

Step 1: Wash the blueberries and place them in a pan on a medium heat; any excess water will help speed up the process of breaking them down.

Step 2: After a few minutes the blueberries will start to burst from the heat and release their natural juices. Stir frequently and add your lemon juice. Continue to cook until the pan is full of gloriously dark and shiny liquid and gently bubbling.

Step 3: Use a potato masher to squish the berries so no whole berries remain. If you wanted to you could also strain through a sieve, but I did not feel that it was necessary as The Food Baby is fine with some texture.

Step 4: Add your slackened cornflour and stir, lower the heat, but so that it is still gently simmering and allow to thicken for a few minutes. Remove from the heat and allow to cool.

You can portion this up and keep it in the fridge for a few days or freeze them. If you find the mixture is too tart then you could add a little maple syrup to sweeten it, or of course you could use sugar, or honey (but only use honey if your child is over 12 months).

(Chilli) Cheese Straws

  • 17th August 201818th August 2018
  • by thefoodwife

Makes approximately 36

Cheese straws are great as a nibble with drinks, and making your own is easy and you can choose which cheese to flavour them with.

Using a ready-rolled puff pastry makes it super quick to prepare and you don’t have to worry about rolling the pastry out to an exact thickness.

I used Mexicana as I wanted to make a slightly spicy straw. That said, using 100g keeps the heat to a gentle background flavour. Obviously if you want more heat or more cheese just add more. 100g is the minimum amount you’ll want to use.

  • Ingredients:
  • 1 sheet of ready-rolled puff pastry
  • 100g hard/semi-hard cheese, grated (I used Mexicana)

Step 1: Preheat an oven to 180-200c and line one or two baking sheets with baking parchment.

Step 2: Lay out your sheet of puff pastry on a board, but keep it on the grease proof paper.

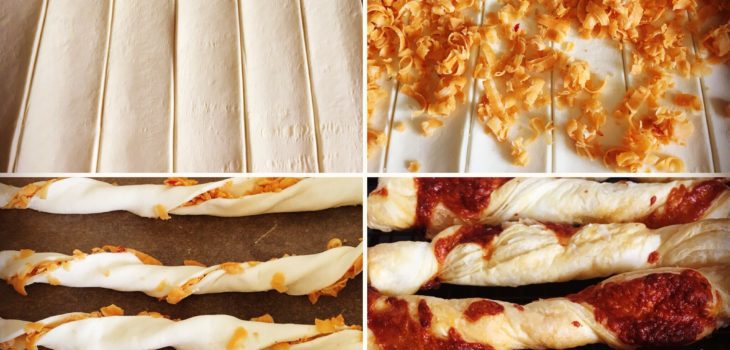
Step 3: Use a sharp knife to carefully cut in two lengthways, then in to strips roughly 2cm wide.

Step 4: Sprinkle the grated cheese over the pastry and then carefully fold each strip in half lengthways, gently pressing down as you go.

Step 5: Pick up each piece and gently stretch and twist, and lay on the lined baking sheet. Repeat with each piece and ensure there is a couple of centimetres gap between each one.

Step 6: Bake in the oven for 25-30 minutes until risen and golden.

Step 7: Allow to cool on a wire rack.

Keep in an airtight container, best eaten within 24 hours.

For extra oomph try brushing the pastry with a little mustard before sprinkling the cheese. Add thin strips of Parma ham (along with the cheese) for a meaty version.

Thai Red Ox Cheek Curry

  • 15th August 201818th August 2018
  • by thefoodwife

Serves 6-8

This week it was our wedding anniversary and I asked The Food Husband what he would like to eat to celebrate at home (after treating ourselves to a fabulous meal at Menu Gordon Jones in Bath at the weekend). We decided that a Thai curry using ox cheek was the winner. It’s definitely a favourite and is an excellent way of using the cut of meat.

If you’ve never tried cheek you must. It requires a lot of cooking but when it is treated in this way you are left with the most succulent, melt in the mouth, flavoursome meat. And the good news is it’s cheap. It’s only about seven or eight pounds a kilo and this will feed eight people, so very economical for something so delicious.

I usually make this with a shop-bought paste in which case I would use maybe half the quantity cited in the ingredients as it is a lot spicier than my homemade version. But this time I’ve made my own (gentler) paste which can be found here. You are looking for 500ml of liquid – I have used a tin of coconut milk and then topped it up with water as I was making a more calorie friendly version. For a richer, more traditional curry, use all coconut milk. You can add whichever vegetables you would like to the curry. I chose mushrooms, peppers and bamboo shoots. Aubergine, courgette and green beans would also work well.

This can be cooked low and slow in the oven or, as I’ve done it this time, in the Instant Pot in a fraction of the time. If cooking in the oven do steps one and two on the hob on a medium high heat and then transfer to the oven with the lid on for step three and cook at 150c for four hours (do check every so often if it needs more liquid though). Return to the hob for stage four onwards.

Once cooked, if serving fewer people, portion up and freeze. Once defrosted it’ll only take a few minutes to heat back through on the hob.

  • Ingredients:
  • 1 tbsp coconut oil
  • 8 shallots, peeled and quartered
  • 3 heaped tbsp Thai red curry paste
  • 2 ox cheeks (total between 800g-1kg in weight), cut in to 2 inch square dice
  • 500ml coconut milk (or mix of water and coconut milk)
  • 6 lime leaves
  • 2 peppers, cut into large dice
  • 1 tin of bamboo shoots, drained
  • 300g Mushrooms, halved (I used Chinese straw mushrooms)
  • 2 tbsp sugar
  • 2 tbsp fish sauce
  • Salt

Stage 1: Set the Instant Pot to sauté mode and add the coconut oil and shallots. Stir frequently for a few minutes until the start to brown, then add the ox cheek and seal on all sides.

Step 2: Once the meat is browned, add the curry paste and stir so that it starts to cook out and has a good covering over the meat. Then add your liquid and the lime leaves and stir.

Step 3: Turn sauté mode off and replace the lid, ensuring the valve is set to sealing. Manually set it to cook on high pressure for 35 minutes. Allow it to depress naturally.

Step 4: Remove the lid and remove the meat, use two forks to shred the flesh, and then return to the pot.

Step 5: Switch back on to sauté mode and add your vegetables, sugar, fish sauce and salt (to taste). Cook for 10-15 minutes until the vegetables are cooked.

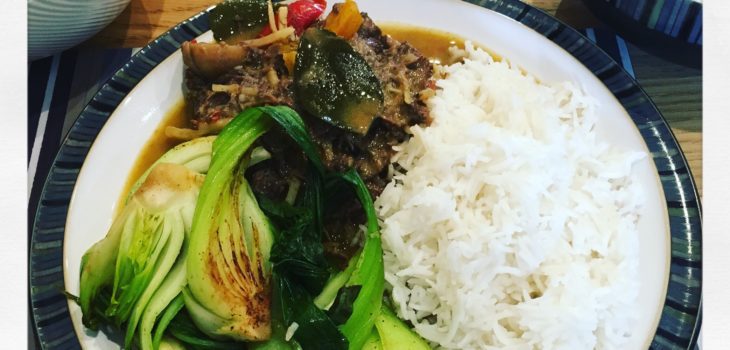
Try serving this with steamed rice, a green vegetable (we had pak choi) and a simple cucumber salad; simply slice cucumber, sprinkle over a pinch of salt and some lime juice and add a little mint (if you like). We also had a few cheeky prawn crackers.

Posts pagination

Previous page 1 … 52 53 54 55 56 … 68 Next page

Newsletter

Blog Search

Blog Categories

  • Air fryer 2
  • Alcohol 12
  • Baby Weaning 24
  • Baking 74
  • Beef 18
  • Bread 1
  • Brunch 7
  • Cake 47
  • Chicken 48
  • Christmas 14
  • Cocktails 9
  • Dairy-Free 228
  • Dessert 37
  • Duck 1
  • Fish 12
  • Gluten-Free 254
  • Instant Pot 19
  • Lamb 6
  • Lunch box fillers 2
  • Ostrich 1
  • Pasta 4
  • Pescatarian 13
  • Pork 38
  • Rabbit 1
  • Salad 9
  • Shellfish 10
  • Soup 1
  • Turkey 10
  • Uncategorised 6
  • Vegan 136
  • Vegetarian 243

Socials

  • Facebook
  • Twitter
  • Google
  • Linkedin
  • Instagram
  • Pinterest
  • Youtube
Theme by Colorlib Powered by WordPress
Back to top