Skip to content
The Food Wife logo
  • Home
  • About
  • Blog
  • Contact

Blog

Baked Rice with Broccoli

  • 1st July 2019
  • by thefoodwife

Serves 2-3 as a side dish 

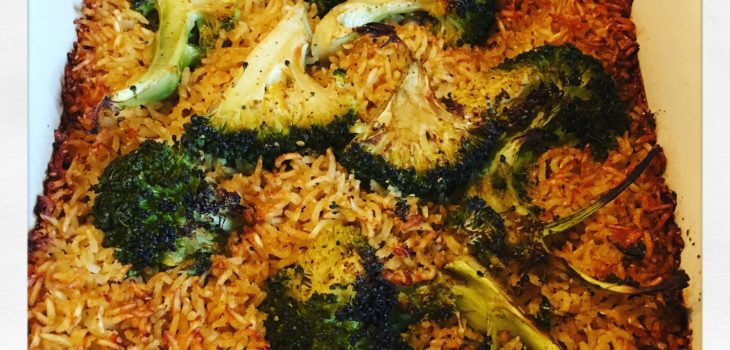
I made this as an accompaniment to my daal recently. It was the vegetable and rice in one dish which needed hardly any prep and even little interference from me as a cook. Perfect for when you are on bedtime duty but want to eat soon after the kids are in bed!

I decided to add garam masala to my rice, but this is optional. You can also mix up the veg you use; cauliflower would be good too.

Baking the brown rice results in fluffy gains and a crispy top (my favourite bit) and makes the rice go further too. Normally I cook 75g of rice per person but have found that cooking the rice this way, only 50g is needed, unless you are particularly hungry.

Ingredients:

150g brown basmati rice

200g broccoli, cut into florets

700ml hot stock (gluten-free if required)

2 heaped tsp garam masala (optional)

Step 1: Preheat your oven to 180c fan. 

Step 2: Spread the rice evenly over the base of a baking dish (it needs to be deep enough to hold the stock too).

Step 3: Spread the broccoli out over the top and sprinkle everything with the garam masala (if using).

Step 4: Pour the hot stock over everything (if the stock is unsalted, add a pinch of salt now).

Step 5: Transfer to the oven and bake undisturbed for one hour.  Remove from the oven and serve.

Love Your Leftovers

  • 25th June 201925th June 2019
  • by thefoodwife

This week I’m focusing on transforming leftovers into something delicious. One of the key lessons I learnt from my grandparents was ‘waste not want not’. Nothing would be wasted from a meal. Anything that wasn’t eaten would be used the next day. I’m a big fan of leftovers, less so when they are termed as ‘scraps’ which is my parents word of choice; “what’s for dinner, mum?” “Baked potato and scraps!” Hmmmm…

Anyway, on Sunday we had a roast chicken. I was going out for the day and prepared the potatoes in the morning, peeling them and leaving them in cold salted water ready to be par-boiled that afternoon. I was left with a large pile of potato peelings. I left them too, in a large bowl of cold water and went out for the day. Waste not want not. When I got home I drained them and then dried them in a clean tea towel, tossed them in a drizzle of garlic infused rapeseed oil, salt, pepper and smoked paprika and then spread on a lined baking sheet. I popped them in the oven for 30 minutes. I started at 200c for the first 15 minutes and then jammed it up to 220c for the final 15 (just check them every now and again to check how they’re getting on). The result? Potato peelings transformed into a pre-dinner crispy snack! 

Now what to do with the leftover chicken? Well I’ve revisited a couple of my recipes; starting with my Thai-style Chicken and Mango Noodle Salad. So refreshing now the weather is heating up! And to finish up the remaining chicken I will be using my Instant Pot to make a Mexican Rice Bowl and will incorporate the shredded chicken breast at the end. 

And finally don’t forget to use the carcass of the chicken to make a wonderful stock, perfect for soups. Boil up the bones in water with an onion, carrot, celery, bay leaf and peppercorns for a couple of hours. Drain the liquid off and allow to cool before storing in the fridge for a few days (or once cool pop it in the freezer for another day). So love your leftovers and remember to waste not want not!

Cacio e Pepe

  • 17th June 2019
  • by thefoodwife

Serves 2

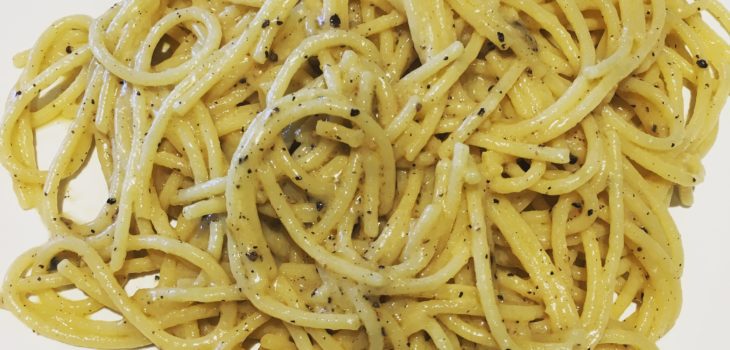
Cacio e Pepe is an Italian dish of pasta (spaghetti) with cheese and pepper. It’s a very quick and simple dish that is utterly delicious and real comfort food. 

Each strand of pasta is coated in an emulsion of olive oil, butter, ground black pepper and cheese (pecorino or parmesan). 

By frying the freshly ground black pepper first in the olive oil, you will release the natural oils in the pepper to give a more intense hit of flavour.  

Scale up or down as required.

Ingredients:

150g Spaghetti (gluten-free if required)

2 tbsp olive oil

1 tbsp freshly ground black pepper 

25g butter

50g finely grated Parmesan or Pecorino Romano (vegetarian if required)

Step 1: Cook the spaghetti according to the packet instructions.

Step 2: Meanwhile  heat the oil over a medium heat in a frying pan. Add the pepper and allow to sizzle for a minute or two.  Remove from the heat.

Step 3: Once the pasta is cooked, return the frying pan to a low heat and add a small ladle full of the cooking water to the oil and pepper. Add the butter and melt.  Use tongs to transfer the cooked spaghetti to the frying pan and toss through, along with the parmesan, until each strand of pasta is coated.  Serve.

Chicken with Lemon, Garlic and Capers

  • 10th June 201910th June 2019
  • by thefoodwife

Serves 2

For such a quick and simple recipe this is full of flavour and incredibly satisfying.

It’ll take five minutes of prep, a little time to marinate and then 10 minutes of cooking and it’s ready to eat. The Italian flavours here work with a variety of accompaniments. My go-to would be garlic and rosemary roasted or sautéed potatoes, but linguine dressed in olive oil and parmesan would also be well suited. Or for a plainer carbohydrate try basmati rice.

It is important to butterfly the chicken breast to make it an even thickness for even cooking. If you’re not sure how to do this, find a guide here.

Ingredients:

2 chicken breasts, butterflied 

1 unwaxed lemon (zested and then cut in half)

3 tbsp garlic-infused olive/rapeseed oil (or 3 tbsp oil with 2 fat cloves of garlic, minced)

Salt and pepper

3 tbsp capers in brine, drained

Step 1: Begin by marinating the chicken in the zest of the lemon, the garlic oil and a pinch each of salt and pepper. Cover and leave for about an hour (minimum 30 minutes, maximum over night).

Step 2: Heat a frying pan over a medium high heat. Add the chicken breasts ensuring that they are flat in the pan. Remember you are aiming for even cooking.  Cook for three or four minutes on each side; the breasts should be cooked through with no pinkness remaining.  At this point squeeze in the juice of half the lemon and add the capers to the pan.

Step 3: Serve with a wedge of lemon and your chosen accompaniments, such as roasted rosemary and garlic potatoes and green beans.

Sunshine Kebabs

  • 7th June 201910th June 2019
  • by thefoodwife

Serves 2-3

We’re moving into summer and with it (hopefully) barbecue weather. Here is a recipe that is gluten free, and can be made with chicken or halloumi, suiting meat eaters or vegetarians.  Using the chicken keeps them dairy free too.

 A little prep, a couple of hours marinating and then ten minutes cooking and you’ve got some pretty tasty kebabs. These aren’t just for the barbecue though, and work well under a hot grill, so not to worry if the weather lets us down, these can be cooked easily in the kitchen! 

I’ve called them sunshine kebabs because they taste wonderfully summery and the orangey red colour of the marinade makes me think of the summer. Coupled with colourful peppers it’s sunshine on a stick!

Ingredients:

1 heaped tsp smoked paprika 

2 tsp garlic-infused oil (or 2 tsp oil with 1 clove of minced garlic)

1 tsp dried oregano

Juice of 1 lime 

Salt and pepper

2 chicken breasts, cut into 1 inch pieces or 1 block of Halloumi, cut into 1 inch cubes

Yellow and/or red pepper, deseeded and cut into 1 inch pieces

You will also need 4 wooden skewers, soaked in water for a couple of hours.

Step 1: Two hours before cooking, begin to soak your wooden skewers in water and prepare the marinade. Make the marinade by combining the paprika, oil, oregano, lime juice and a pinch each of salt and pepper in a bowl. Toss the chicken or halloumi pieces so they are well coated, cover and leave in the fridge to marinate.  If using chicken aim to remove it from the fridge 20 minutes before assembling the kebabs to bring back to room temperature.

Step 2: Just before cooking, assemble the kebabs by skewering alternate pieces of pepper and chicken/halloumi carefully onto the skewers.

Step 3: Cook under a hot grill or on a barbecue for a few minutes on each side until cooked through and scorched slightly from the heat.

Serve with fresh salad and freshly pickled red onion (thinly slice red onion and drizzle with fresh lemon/lime juice or a little red wine vinegar and a pinch of salt and leave for an hour or two). Great stuffed in a pitta or in a wrap!

Posts pagination

Previous page 1 … 37 38 39 40 41 … 68 Next page

Newsletter

Blog Search

Blog Categories

  • Air fryer 2
  • Alcohol 12
  • Baby Weaning 24
  • Baking 74
  • Beef 18
  • Bread 1
  • Brunch 7
  • Cake 47
  • Chicken 48
  • Christmas 14
  • Cocktails 9
  • Dairy-Free 228
  • Dessert 37
  • Duck 1
  • Fish 12
  • Gluten-Free 254
  • Instant Pot 19
  • Lamb 6
  • Lunch box fillers 2
  • Ostrich 1
  • Pasta 4
  • Pescatarian 13
  • Pork 38
  • Rabbit 1
  • Salad 9
  • Shellfish 10
  • Soup 1
  • Turkey 10
  • Uncategorised 6
  • Vegan 136
  • Vegetarian 243

Socials

  • Facebook
  • Twitter
  • Google
  • Linkedin
  • Instagram
  • Pinterest
  • Youtube
Theme by Colorlib Powered by WordPress
Back to top
imunify-bot-check