Skip to content
The Food Wife logo
  • Home
  • About
  • Blog
  • Contact

Blog

Instant Pot Mexican Rice Bowl

  • 22nd January 201922nd January 2019
  • by thefoodwife

Serves 2-4

The Instant Pot is excellent for one-pot meals, especially as you can sauté ingredients first without using multiple pieces of equipment. This is just such a dish, it is quick to prepare and can be as easy (or as (moderately) complicated!) as you like; you can use homemade or shop bought spice mixes, omit any toppings or have all the toppings.

It is gluten free, and if you are including the chicken, it’s a good way to use up leftovers from a roast and make a completely different second meal. However it can also be a vegan meal (just don’t include any meat and keep the toppings vegan friendly). If you’re not including any meat then using beans is a good alternative protein. If you are using meat, then it’s a good way to bulk the meal out to serve more people.

N.B. It is important to keep the rice on the top of the contents in the Instant Pot to avoid it catching or burning.

  • Ingredients:
  • 1 tbsp Oil
  • 1 red onion, medium dice
  • 1 pepper, medium dice
  • 1 tin of chopped tomatoes
  • 1 portion of fajita spice mix (or a shop bought sachet)
  • 130g sweetcorn (tinned or frozen)
  • Optional: 1 tin of (kidney) beans, drained
  • 150g basmati or long grain rice (approx. 1 Instant Pot cup)
  • 320ml water (2 Instant Pot cups)
  • Optional: 2 raw chicken breasts or 250g cooked shredded chicken
  • Optional toppings:
  • Sliced spring onions
  • Grated/crumbled cheese
  • Shredded lettuce
  • Diced tomato
  • Sour cream
  • Avocado/guacamole
  • Sliced jalapeños
  • Lime wedges

Step 1: Set your Instant Pot to sauté and add the oil along with the onion and pepper. Cook for a few of minutes, stirring occasionally, until softened.

Step 2: Add the tinned tomatoes and spice mix. Stir well. Sprinkle in the sweet corn and beans (if using). If you are using raw chicken breasts, place in the pot now.

Step 3: Add the water and rice (sprinkle evenly around the pot).

Step 4: Switch off sauté mode and place the lid on and ensure be valve is set to sealing. Manually set on high pressure for 10 minutes.

Step 5: When complete, carefully release the pressure using a wooden spoon and a tea towel.

Step 6: If you have cooked the chicken breasts in the Instant Pot, shred these now. If you are using ready-cooked/left over chicken, stir through the rice now. Replace the lid and leave for a couple of minutes to heat through.

Step 7: Serve each portion in bowls with a selection of toppings of your choice.
What’s For Dinner?

  • 21st January 201922nd January 2019
  • by thefoodwife

This week we’re having several of the recipes from The Food Wife which I thought I’d share for some inspiration if you’re struggling to come up with ideas for meals this week.

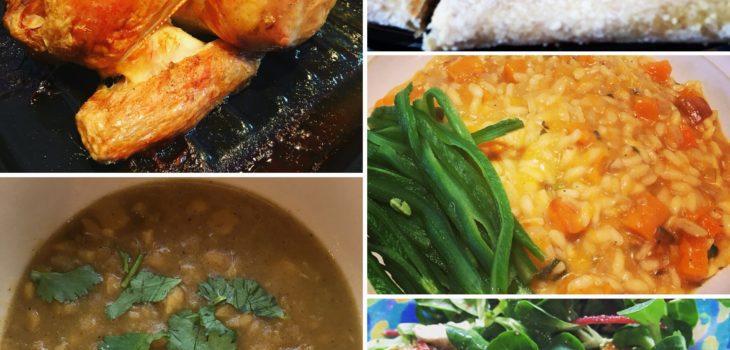
Friends are joining us for lunch on Sunday and I’ll be cooking my roast chicken with preserved lemons but this time rubbing the skin with olive oil and ras al hanout before it goes in the oven and serving it with my spiced butternut squash, feta and pomegranate salad. A winning combination for a lighter lunch rather than a full roast dinner!

With the other half of the butternut squash we’ll be enjoying my butternut squash risotto. I have plans for the leftover chicken too, with a yet-to-feature Instant Pot Mexican rice bowl (watch this space).

Today I’ve made a big batch of daal that’s been portioned up and popped in the freezer so I’ll be getting that out later in the week to enjoy, making a quick and easy, nutritious meal.

And Friday night is currently homemade pizza night in our house; although I’ve been changing things up a bit and making the base using a sourdough starter. I use 300g of starter and reduce the flour and water by 150g and 150ml respectively, and omit the yeast; it proves a little longer but otherwise the recipe is exactly the same.

Hopefully that’s given you some culinary inspiration, including some ways of making ingredients stretch to more than one meal. Let me know in the comments if you’ve tried out any Food Wife recipes this week, and if you haven’t already, why not sign up to the newsletter to get each week’s recipes direct to your email.

Pork Fried Rice

  • 15th January 201915th January 2019
  • by thefoodwife

Serves 4

On a visit to Vietnam a few years ago, one evening we grabbed some dinner at a Bia HÆ¡i (literally “fresh beer”, as you can see the Food Husband enjoying in the photo). It was a humble but tasty affair of fried rice with meat and vegetables, cooked on the street and brought to us whilst we sat on the little plastic chairs on the pavement.

This is a nod to that meal, although the flavourings here are more Chinese with the hoisin and shaoxing rice wine.

I normally make a batch of the flavoured pork and then use half and freeze the other half for a quick and convenient meal for two. The rice is also best if completely cold, so if you’re having a rice dish the night before, just cook some extra and pop it in the fridge ready for this the next day. Always be careful with cooked rice though, it must be fully reheated to ensure no bacteria remains.

  • Ingredients:
  • For the pork sauce:
  • 1 tbsp oil
  • 1 red onion, peeled and finely chopped
  • 1 inch ginger, peeled and finely diced
  • 4 cloves garlic, minced
  • 500g lean pork mince
  • 2 tsp Chinese five spice
  • 3 tbsp shaoxing rice wine
  • 3 tbsp dark soy sauce (gluten-free if required)
  • 1 tbsp fish sauce
  • 5 tbsp hoisin sauce
  • 1 tsp sesame oil
  • Pepper
  • For the fried rice:
  • 1 tbsp oil
  • 4 handfuls of (frozen) vegetables
  • 240g basmati rice, cooked and fully cooled
  • 2 large free-range eggs

Step 1: Heat the oil in a large frying pan or wok. Add the onion, ginger and garlic and stir fry for a couple of minutes.

Step 2: Add the pork mince and cook until browned and dry. Stir frequently.

Step 3: Add the spice, and cook for thirty seconds before adding the rice wine and sauces. Cook for a couple of minutes before seasoning with the sesame oil and a pinch of ground pepper.

At this stage you could freeze portions, or chill in the fridge until ready to use.

Step 4: To make the stir fried rice, heat the oil in a wok and crack in the two eggs. Stir to break these up to create a dry scrambled egg.

Step 5: Add the (frozen) vegetables and continue to stir fry. Next add the cold rice and turn through the egg and vegetables.

Step 6: Once the rice is hot, introduce the cooked pork in its sauce and stir until everything is piping hot. Serve immediately.

Creamy Spinach and Pea Pasta

  • 14th January 201914th January 2019
  • by thefoodwife

Serves 2

I routinely plan each week’s meals in advance and this evening we were supposed to be having carbonara, however I’m actively trying to eat less meat and so I decided to ditch the meat and go veggie tonight. In fact much to my husband’s delight we will have a vegetarian or vegan evening meal several times a week.

The sauce is deceptively creamy. Deceptive because it contains no cream and is actually fairly low calorie. The lemon zest gives it a wonderful freshness and zing and it’s got plenty of vegetables.

This is a vegetarian meal that can be cooked in 15 minutes and so is perfect for a midweek meal.

  • Ingredients:
  • 150g pasta (gluten-free if required)
  • Oil (I used a spray olive oil)
  • 1 onion, peeled and finely diced
  • 1 clove of garlic, peeled and minced
  • 100g frozen peas/petit pois
  • 100g spinach, fresh or frozen, finely chopped
  • 3 heaped tbsp 0% fat Greek yogurt
  • 1 large free-range egg
  • 2 tbsp grated Parmesan
  • 1 unwaxed lemon, zest only
  • 1 tbsp chopped parsley
  • Salt and Pepper

Step 1: Cook the pasta according to the packet instructions.

Step 2: Whilst the pasta is cooking, heat a little oil in a frying pan on a medium heat and add the onion. Soften for a few minutes and then add the garlic.

Step 3: After a minute or two add the frozen peas and spinach and stir, allowing the heat to cook the vegetables; this should take three or four minutes and they should keep their vibrant green colour.

Step 4: Combine the yogurt, egg, lemon zest, parsley and parmesan, and season with a pinch each of salt and pepper.

Step 5: Drain the pasta, reserving a little of the cooking water, and add to the pan, tossing amongst the vegetables. Lower the heat and add the yogurt mixture and a little cooking water to create a creamy sauce which coats the pasta. Check the seasoning and serve immediately.

Paneer

  • 11th January 201911th January 2019
  • by thefoodwife

Makes approximately 250g

My husband loves cheese, as do I, but he loves it so much he wrote a book about it. His family love reciting the story of him leaving a family wedding with a wheel of cheese tucked under his arm as he made his way back to his hotel room.

A family get together always involves a cheeseboard but we hosted the latest celebration and decided we’d also have a cheese dish as part of the main course, a saag paneer to accompany a chicken curry.

Whilst paneer is readily available from the supermarket, it’s easy to make your own and takes only two ingredients and just an hour (during most of which you don’t actually have to do anything) and you’ll have your own homemade batch, plus the satisfaction of knowing you’ve made your own cheese!

  • Ingredients:
  • 2 litres whole milk
  • Juice of 1 lemon

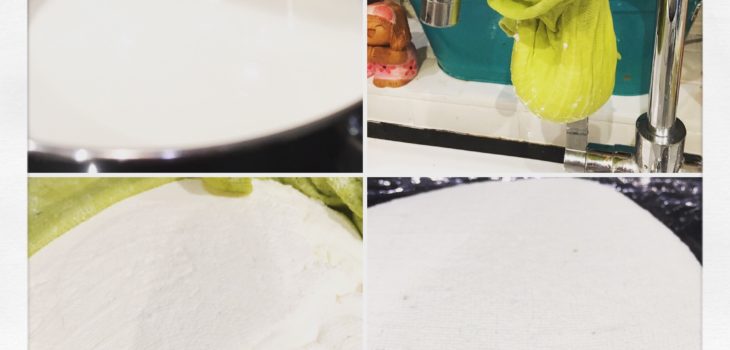
Step 1: Heat the milk in a heavy-bottomed saucepan until it begins to froth and boil (be careful though as a moment too long and the milk will cascade out of your pan; I am speaking from experience!) then lower the heat and stir in the lemon juice. Continue to stir until the milk curdles and separates into the lumpy curds and watery whey.

Step 2: Line a large sieve with a muslin or cheesecloth and place over a pan or large bowl. Carefully pour the curdled milk through, so the curds remain. Run some cold water through the curds to rinse off any whey.

Step 3: Tie the curds in the cloth to hang from the tap for 10 minutes to allow excess whey to drip from it.

Step 4: Remove the cloth-tied curds from the tap and place on a plate, with a heavy object (I used the same milk pan filled with water) on top for 40 minutes. By this time the curds should be set and your paneer ready to use.

Store in the fridge, and any remaining cheese can be frozen.

Posts pagination

Previous page 1 … 44 45 46 47 48 … 68 Next page

Newsletter

Blog Search

Blog Categories

  • Air fryer 2
  • Alcohol 12
  • Baby Weaning 24
  • Baking 74
  • Beef 18
  • Bread 1
  • Brunch 7
  • Cake 47
  • Chicken 48
  • Christmas 14
  • Cocktails 9
  • Dairy-Free 228
  • Dessert 37
  • Duck 1
  • Fish 12
  • Gluten-Free 254
  • Instant Pot 19
  • Lamb 6
  • Lunch box fillers 2
  • Ostrich 1
  • Pasta 4
  • Pescatarian 13
  • Pork 38
  • Rabbit 1
  • Salad 9
  • Shellfish 10
  • Soup 1
  • Turkey 10
  • Uncategorised 6
  • Vegan 136
  • Vegetarian 243

Socials

  • Facebook
  • Twitter
  • Google
  • Linkedin
  • Instagram
  • Pinterest
  • Youtube
Theme by Colorlib Powered by WordPress
Back to top