Skip to content
The Food Wife logo
  • Home
  • About
  • Blog
  • Contact

Category: Dairy-Free

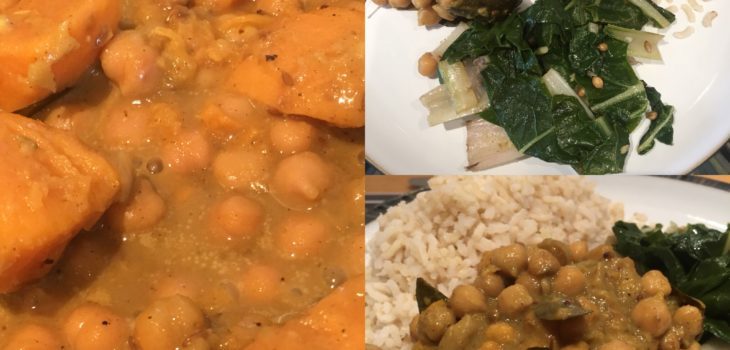
Sweet Potato and Chickpea Curry

  • 4th May 20184th May 2018
  • by thefoodwife

Serves 6

I’ve been sneakily trying to work more vegetarian recipes in to my husband’s diet, and this has become one of his favourites. It is so satisfying that I don’t think he realises he’s missed out on the meat! This recipe is actually vegan, gluten free and best of all, delicious. It is mild in heat but rich in spices and is pleasingly creamy, though lighter on calories due to the relatively small amount of coconut milk used.

Whilst this recipe serves 6, I will make a batch for the two of us and freeze two extra meals to enjoy later. I simply defrost in the fridge for 24 hours and gently reheat to serve.

I like to serve this with brown rice but it is also great as part of a thali (try it as a smaller portion with a daal, rice and a small side salad).

You will also find a version suitable for baby weaning on my website, here.

  • Ingredients:
  • 1 tbsp coconut oil (or oil of your choice)
  • 2 onions, diced
  • 2 garlic cloves, finely diced
  • 2 inch ginger, peeled and diced
  • 3 tsp cumin seeds (ground if you prefer)
  • 1 tsp mustard seeds (ground if you prefer)
  • 1 tsp ground turmeric
  • 2 tsp garam masala
  • 2 cloves
  • 8 cardamom
  • 2 pieces of cassia bark or cinnamon
  • 2 small handfuls of curry leaves
  • Small tin coconut milk (160ml)
  • 300ml vegetable stock
  • 3 sweet potatoes, peeled and cut into 1 inch cubes
  • 2 tins of drained chickpeas
  • Salt and pepper to taste

Step 1: Melt the coconut oil on a medium heat and add the diced onion, garlic and ginger. Soften for a couple of minutes and then add each of the spices, stirring to ensure they don’t burn.

Step 2: Add the small tin of coconut milk along with the vegetable stock (ensure you use a gluten free stock if you need to keep the curry suitable for those with a gluten intolerance/allergy).

Step 3: Add the cubed sweet potato and simmer until tender (this should take about 10 minutes).

Step 4: Five minutes before you are ready to serve the curry add the 2 tins of drained chickpeas to the pan, and heat through. Season as necessary (be aware that the stock you have used may well be salty enough).

This week I served it with some homegrown Swiss chard, roughly sliced and sweated in a little coconut oil with a crushed garlic clove, 1/4 tsp of dried chilli flakes, 1/2 tsp coriander seeds and 1/2 tsp of ground cumin seeds. Delicious.

Sticky Chilli Chicken

  • 28th April 201828th April 2018
  • by thefoodwife

Serves 4-6

There is something deeply satisfying about eating juicy meat straight off the bone, and my sticky chilli chicken does not disappoint. The ingredients are simple and, if you’re anything like me, they are probably things you’ll find lurking in the fridge or cupboard.

  • Ingredients:
  • 1kg chicken pieces (a mix of thighs and drumsticks)
  • 1 red onion cut into thin wedges
  • 2 carrots cut into batons
  • 1 red pepper cut in to one inch pieces
  • 1/2 orange cut into eight pieces
  • Juice of half an orange
  • 1 inch ginger peeled and diced
  • 1 heaped tbsp chilli jam
  • 2 heaped tbsp apricot jam
  • 2 tbsp maple syrup
  • 1 tbsp red wine vinegar

Step 1: Add all ingredients into a large sealable bag (I like using the large ones from IKEA – I’m sure you know the ones I mean, they are frequently listed as a must-have purchase when paying the big blue box a visit). Squish everything together so the meat and vegetables are pleasingly coated in the sticky mixture. Leave (preferably overnight) in the fridge to marinate.

Step 2: Spread the contents of the bag in a baking tin and put in a 190c oven for 50 minutes.

Serve with rice, and if you fancy some extra veg, some steamed greens.

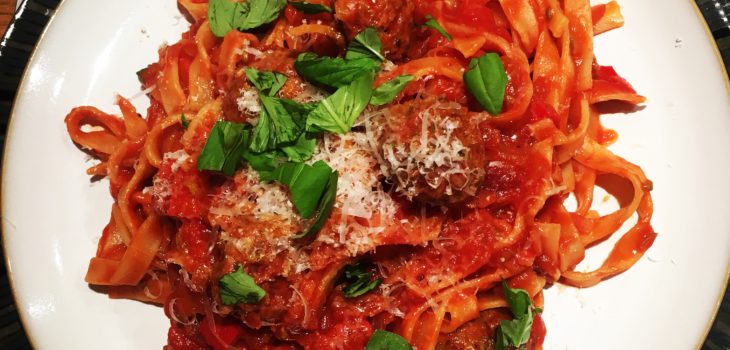
Meatballs

  • 26th April 201827th April 2018
  • by thefoodwife

Serves 6

What carnivore doesn’t love a good meatball? There is something so comforting about a big plate of pasta coated in a rich and spicy tomato sauce studded with succulent meaty morsels.

I’ve made many different types over the years and have learned a few things I’d like to share. A meatball made of only lean meat is too dry. A combination of meats is the way to go. Baking them before adding to the sauce results in a far tastier end product. And the addition of fennel seeds to the tomato sauce just makes it all the more delicious and, well, Italian.

My most recent meat combination has been half pork stuffing (heavily laden with herbs) and half lean mince meat. I’ve tried this recipe with lean (5% fat) beef mince and also lean ostrich mince. It may sound like a strange meat to use, but I would really recommend giving it a try. It’s incredibly lean and high in protein. This, coupled with the fattier pork, results in a really tasty meatball. But don’t worry, if I haven’t convinced you, beef is nearly just as good.

  • Ingredients:
  • The meatballs:
  • 300g lean mince e.g beef or ostrich
  • 340g herby pork stuffing mix/sausage meat (ensure this is without gluten if you are making it gluten free)
  • The sauce:
  • 2 tbsp olive oil
  • 2 red onions, diced
  • 4 cloves garlic, minced
  • 1 red pepper, diced
  • 4 tsp fennel seeds
  • 2 tsp chilli flakes (optional)
  • 1 litre passata
  • 2 tsp balsamic vinegar
  • Salt and pepper to taste
  • To serve:
  • 500g Pasta (gluten free if necessary)
  • Parmesan (leave this out if you are making it dairy free)
  • Fresh basil

Step 1: Start by making your meatballs by simply combining the two meats in a bowl and mixing well (although messy you’ll get the best results by using your hands, which are going to get messy in the next step anyway!)

Step 2: Roll small amounts of the mix between your two hands to make balls (the mix will make about 35 small balls although you can make them bigger if you wish).

Step 3: Place the balls on a baking tray and put in a preheated oven at 200c for 25 minutes (bear in mind if you make bigger balls they’ll take longer).

Step 4: Whilst the meatballs are cooking, make your sauce. On a medium heat, add your oil to a pan and your red onion, garlic and red pepper. Soften for 3-4 minutes, stirring every so often, to make sure the garlic and onion do not burn. Add your fennel seeds and chilli flakes (if using) and stir for a minute or two, before adding your passata and balsamic vinegar. Season to taste. Cook the sauce on a low heat for 10-15 minutes. Whilst this is simmering cook your pasta according to the packet instructions.

Step 5: Remove your meatballs from the oven and add to your sauce.

Step 6: When you are ready to serve, add cooked pasta to the sauce and coat evenly. Use some of the pasta cooking water to loosen if necessary.

Step 7: To serve, sprinkle Parmesan and torn fresh basil leaves over the pasta and meatballs.

These meatballs freeze well; freeze them separately to the sauce once they have been baked in the oven. They can be defrosted and then added to a sauce to heat through whilst the pasta is cooking.

Chinese Beef with Ginger

  • 21st April 20186th August 2018
  • by thefoodwife

Serves 2-3

One of the first things I learned to cook as a child was Sweet and Sour Chicken. Granted, it was initially a jar of Uncle Ben’s, but I soon progressed to making my own sauce from scratch with the help of my mum’s cookbooks. My mum really encouraged my cooking (after all it meant I was happy to prepare and cook for my brothers and sister!) although she wasn’t so keen on the mess I’d leave behind. Nowadays I’m a much tidier cook, helped of course by the fact I’m the one who has to clean up!

Fast forward 25 years and I appreciate something with a bit more flavour; don’t get me wrong, I still love sweet and sour, but this is punchier and sticky from the cornflour and scant sauce. I always make this with beef skirt, it’s a cheaper cut but flavoursome, and suits being cut into thin strips, but you could use a steak of your choice. I include a chilli as I like the heat, but it’s not essential, and you’ll still get a bit of fire from the ginger. I prefer dark soy sauce in this dish, for both colour and flavour, and it also helps contribute to the stickiness. The garnishes are by no means obligatory, by all means use just one or two, or even none.

Now, this beef dish is so quick to cook – once you start it in the wok it’ll be ready to serve in about five minutes, so the key is preparation. Have everything ready to go (it should only take about 10 minutes to prepare) and then follow my steps in quick succession and hey presto, dinner is ready!

  • Ingredients:
  • 2 inch piece of ginger, peeled and finely diced
  • 2 cloves of garlic, peeled and finely diced
  • 1 chilli (optional), finely diced
  • 2 medium carrots or 1 large carrot, peeled and sliced thinly on the diagonal
  • 3 spring onions sliced diagonally
  • 250g beef skirt cut into thin strips
  • 2 tbsp dark soy sauce
  • 1 tbsp rice wine vinegar
  • 1 tsp sugar
  • 1 tsp sesame oil
  • 2 tbsp oil
  • 1 heaped tbsp corn flour
  • To garnish (optional):
  • Coriander leaves
  • Sesame seeds
  • Crispy onions (I buy ones ready fried)

Step 1: Prepare all of the ingredients so you are ready to cook. Once you start it’ll be ready in about five minutes!

Step 2: Heat 2 tbsp of oil on a high heat in a wok.

Step 3: Add the meat and quickly stir to avoid it from sticking.

Step 4: Add the cornflour and stir to coat the oily beef.

Step 5: Add the garlic, ginger and chilli (if using) and stir.

Step 6: Add the spring onion and carrot and then stir.

Step 7: Add the sugar, dark soy sauce, rice wine vinegar and sesame oil, then stir so everything is coated.

Step 8: Stir fry for 2-3 minutes, by which time the meat should be cooked through and the vegetables al dente.

Serve with rice (I like to use sticky sushi rice) and add the garnishes, if you are using. I would also recommmend a few prawn crackers on the side.

Homemade Fajita Spice Mix

Homemade Fajita Spice Mix

  • 19th April 201819th April 2018
  • by thefoodwife

Makes 1 portion

Whilst shop-bought spice mixes are convenient it is sometimes nice to make your own to create a blend to your desired taste. I like a fairly spicy fajita mix and have put this blend together, however if you like it less hot, tone down the chilli; if you like it hotter, add a bit more!

The quantities here can be scaled up as necessary, and if you make a larger batch, it can be stored in an air tight container for a few weeks.

  • Ingredients:
  • 1 tsp (chipotle) chilli flakes/chilli powder
  • 1 tsp smoked paprika
  • 1 tsp ground cumin
  • 1 tsp dried oregano
  • 1 tsp garlic powder
  • 1/4 tsp ground cinnamon
  • Pinch of ground white pepper
  • 1 tsp sugar
  • 1/2 tsp salt

Combine all the ingredients and mix thoroughly.

Posts pagination

Previous page 1 … 43 44 45 46 Next page

Newsletter

Blog Search

Blog Categories

  • Air fryer 2
  • Alcohol 12
  • Baby Weaning 24
  • Baking 74
  • Beef 18
  • Bread 1
  • Brunch 7
  • Cake 47
  • Chicken 48
  • Christmas 14
  • Cocktails 9
  • Dairy-Free 228
  • Dessert 37
  • Duck 1
  • Fish 12
  • Gluten-Free 254
  • Instant Pot 19
  • Lamb 6
  • Lunch box fillers 2
  • Ostrich 1
  • Pasta 4
  • Pescatarian 13
  • Pork 38
  • Rabbit 1
  • Salad 9
  • Shellfish 10
  • Soup 1
  • Turkey 10
  • Uncategorised 6
  • Vegan 136
  • Vegetarian 243

Socials

  • Facebook
  • Twitter
  • Google
  • Linkedin
  • Instagram
  • Pinterest
  • Youtube
Theme by Colorlib Powered by WordPress
Back to top