Skip to content
The Food Wife logo
  • Home
  • About
  • Blog
  • Contact

Category: Dessert

Poached Pears

  • 18th March 201918th March 2019
  • by thefoodwife

Serves 6

A dessert you can make ahead of time is a winner when entertaining. These pears are poached in a simple sugar syrup flavoured with vanilla and cinnamon. By all means add some other aromats; try star anise, lemon or orange peel.

The length of time they poach for will depend upon their ripeness. Mine were just ripe and took 30 minutes. But they will take less time if they are more ripe (and vice versa).

You could also go biblical and exchange the water for wine; in either case make sure you reduce the syrup by half once you have removed the cooked pears.

  • Ingredients:
  • 300g caster sugar
  • 1L water
  • 1 vanilla pod (split lengthways and scrape out the seeds, then use both the seeds and the pod)
  • 1 large cinnamon stick
  • 6 Pears

Step 1: Put the sugar, water, vanilla and cinnamon in a large saucepan.

Step 2: Carefully peel your pears, leaving the stalk intact, and then slice the bottom of the pear off so that they can stand up.

Step 3: Place the pan over a medium-high heat, and once the sugar has dissolved use the stalks to carefully put each pear into the liquid. Bring to a simmer and either place a lid on the pan, or use a piece of baking parchment pressed into the surface of the liquid.

Step 4: Simmer until tender (check them after 20-30 minutes, but it will depend on the ripeness of the pear).

Step 5: Remove the pears from the spiced sugar syrup. Keep the lid or paper off the pan and reduce the syrup by half by which time it should by slightly thicker and nice and sticky.

These can be made a day or two ahead of time. Store the pears in their syrup in an airtight container in the fridge. They can be eaten hot or cold. Serve on their own or with ice cream.

New Year Rocky Road

  • 1st January 20191st January 2019
  • by thefoodwife

Makes approximately 30 pieces

I’ve posted a recipe for rocky road before, and called it my ultimate rocky road. It is seriously good but this new year I went down a different path. Inspired by a strangely moreish delicacy of chocolate covered gummy bears I discovered in New York five years ago, this rocky road features a layer of gummy bears that make a more fruity, chewy hit in each piece.

These were taste-tested at a party between Christmas and New Year (hence their name) and went down very well, at least I assume they did as every piece disappeared!

  • Ingredients:
  • 200g dark chocolate, melted
  • 200g milk chocolate, melted
  • 100g white chocolate, melted
  • 100g butter
  • 2 tbsp golden syrup
  • 100g gummy bears
  • 100g maltesers
  • 100g munchies
  • 50g mini marshmallows
  • 10 rich tea biscuits, roughly crushed

Step 1: Have your three molten chocolates in separate bowls.

Step 2: Melt together the butter and syrup (I did this in the microwave, but you could do this on the hob) and then split between the dark and milk chocolate and stir until smooth.

Step 3: Line a shallow baking tray (such as a brownie pan or swiss roll tray) with greaseproof paper.

Step 4: Spread the gummy bears across the lined tray. Pour half the dark and half the milk chocolates over the gummy bears.

Step 5: In a bowl combine the crushed biscuits, maltesers, munchies and marshmallows with the remaining dark and milk chocolate. Pour over the gummy bears and chocolate and spread out until even.

Step 6: Use a spoon to drizzle the white chocolate over everything and allow to set (in a cool room or fridge) and then slice into squares (this is best done when not fully set).

I keep these in the fridge, wrapped either in tin foil or in an air tight container.

Mince ‘Pie’ Cupcakes with Custard Buttercream

  • 23rd December 201823rd December 2018
  • by thefoodwife

Makes 12

This weekend I’ve been experimenting in the kitchen, and here is my creation; cupcakes, studded with spiced fruit and topped with a vanilla custard buttercream. A reimagining of the classic mince pie and custard.

Perhaps you have a jar of leftover mincemeat that you’ve been wondering what to do with, or perhaps you’ll pick up a jar reduced after Christmas. Either way this is something a little different to do with it.

The quantity of buttercream allows for a thin layer to be spread over each cake. Alternatively you could pipe a decorative splodge (technical term) on the top of each one. But if you want to have a full, piped covering you will need to double the quantities.

We will be enjoying these when family come to visit over Christmas, so hopefully they will go down well with their festive twist. Merry Christmas!

  • Ingredients:
  • For the cakes:
  • 115g softened butter or margarine
  • 125g caster sugar
  • 2 large free range eggs
  • 125ml milk
  • 225g self-raising flour
  • Pinch of salt
  • 300g mincemeat (homemade or shop-bought)
  • For the buttercream:
  • 125g icing sugar, sifted
  • 4 heaped tsp custard powder, sifted
  • 125g softened butter
  • 1 tsp vanilla extract

Step 1: Cream the butter and sugar then slowly add the eggs and milk as you continue to beat them together. As you beat the mixture, add the flour a spoonful at a time until you have a smooth batter, and finish with a pinch of salt.

Step 2: Fold through the mince meat.

Step 3: Divide the mixture between 12 large cupcake cases set on a baking tray and bake in a preheated oven at 180c (fan) for 20-22 minutes until golden and risen and they spring back to the touch.

Step 4: Remove from the oven and leave on the baking tray for a couple of minutes and then transfer the cases to a wire rack to fully cool.

Step 5: Once fully cool, make the buttercream by beating together all of the ingredients until you have a smooth, pale yellow buttercream.

Step 6: Pipe or spread the buttercream over the cakes and add any extra decorations you desire.

Vanilla (and Raspberry) Cupcakes with a White Chocolate Buttercream

  • 19th November 201819th November 2018
  • by thefoodwife

Makes 12

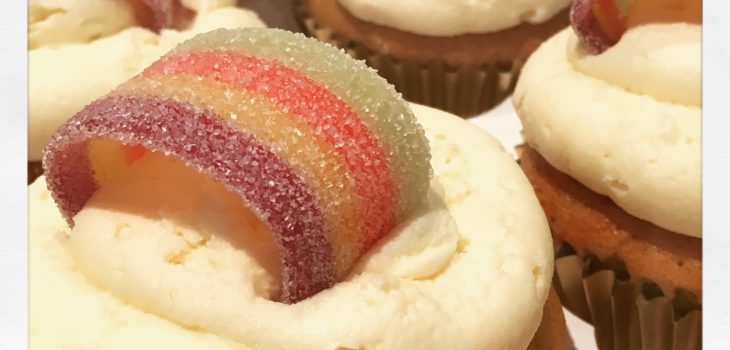
When the Food Baby turned one last month I decided on a rainbow theme for his celebration. On the healthy side of things my sister expertly created some rainbow fruit kebabs, whilst on the more treat side I created some rainbow decorated cupcakes to complement the main rainbow cake.

These had a vanilla and raspberry sponge (although the raspberry is optional), topped with a wickedly rich white chocolate buttercream. I chose to add a sweet decoration on top because at a children’s party the more sugar the better. But otherwise I would either have left them as the plain buttercream or added a fresh raspberry on top.

  • Ingredients:
  • For the sponge:
  • 150g softened butter or baking margarine
  • 150g golden caster sugar
  • 3 large eggs
  • 150g self raising flour, sifted
  • 3/4 tsp baking powder
  • Pinch of salt
  • 1 tsp vanilla extract
  • 1 1/2 tbsp milk
  • 12 frozen raspberries (optional)
  • For the buttercream:
  • 125g softened butter
  • 250g icing sugar, sifted
  • 100g white chocolate
  • 1 tsp vanilla extract
  • 1 tbsp milk

Step 1: Line a 12-hole muffin tray with cases and preheat your oven to 180c.

Step 2: Beat together the butter and sugar until combined and then add the eggs, one at a time, beating as you go.

Step 3: Add the flour, and beat in along with the baking powder, salt, vanilla and milk until you have a smooth batter.

Step 4: Spoon the batter into the cases so that they are about 2/3 full and then, if you are using the raspberries, place one raspberry in the centre of each.

Step 5: Bake for 20 minutes until the cakes are risen and golden and spring back when pressed lightly.

Step 6: Leave in the tray for 10 minutes and then remove to a wire rack to cool completely.

Step 7: Melt the white chocolate in a microwave-proof bowl in 30 second bursts, stirring after each time. It’ll take about two minutes in total. Leave to cool for five minutes.

Step 8: Whisk the butter and icing sugar together until light and smooth.

Step 9: Add the vanilla, milk and cooled chocolate and continue to whisk until fully combined.

Step 10: Once the cakes are completely cool, spread or pipe the buttercream over the tops. Add any extra decorations you desire (a whole fresh raspberry would work well).

Banana and Oat Pancakes

  • 6th September 20186th September 2018
  • by thefoodwife

Makes 7-8

These are a real hit with the Food Baby and so quick to make. I served these for pudding with a dip of full fat Greek yogurt, with a spoonful of fruit compote or jam swirled through it and then for breakfast with a smear of peanut butter on top; both times very well received and demolished.

This picture shows just how well they first went down as the Food Baby first tried to lick the bowl clean and then eat the bowl!

Serve one or two of these at a time, the rest can be frozen (I did so in pairs) and defrosted when needed and re-heated in a toaster or a quick zap in the microwave.

  • Ingredients:
  • 1 large banana, mashed
  • 60g oats
  • 60g self raising flour
  • 1/2 tsp baking powder
  • Large pinch of ground cinnamon
  • 1 egg, beaten
  • Splash of full fat milk (about 50ml)

Step 1: Mix all the ingredients together until you have a well-combined batter.

Step 2: Heat a non-stick frying or crepe pan on a medium-high heat and add a little butter or oil (I used a spray oil).

Step 3: Spoon two tablespoons of mixture into the pan (I could cook three at once) and cook for a couple of minutes until little bubbles appear and they are golden brown on the underside and firm enough to flip over, then cook for a further couple of minutes on the other side.

Of course these aren’t just for babies! Try them with chopped fresh fruit and maple syrup or Greek yogurt for a delicious breakfast.

Posts pagination

Previous page 1 … 5 6 7 8 Next page

Newsletter

Blog Search

Blog Categories

  • Air fryer 2
  • Alcohol 12
  • Baby Weaning 24
  • Baking 74
  • Beef 18
  • Bread 1
  • Brunch 7
  • Cake 47
  • Chicken 48
  • Christmas 14
  • Cocktails 9
  • Dairy-Free 228
  • Dessert 37
  • Duck 1
  • Fish 12
  • Gluten-Free 254
  • Instant Pot 19
  • Lamb 6
  • Lunch box fillers 2
  • Ostrich 1
  • Pasta 4
  • Pescatarian 13
  • Pork 38
  • Rabbit 1
  • Salad 9
  • Shellfish 10
  • Soup 1
  • Turkey 10
  • Uncategorised 6
  • Vegan 136
  • Vegetarian 243

Socials

  • Facebook
  • Twitter
  • Google
  • Linkedin
  • Instagram
  • Pinterest
  • Youtube
Theme by Colorlib Powered by WordPress
Back to top