Skip to content
The Food Wife logo
  • Home
  • About
  • Blog
  • Contact

Category: Gluten-Free

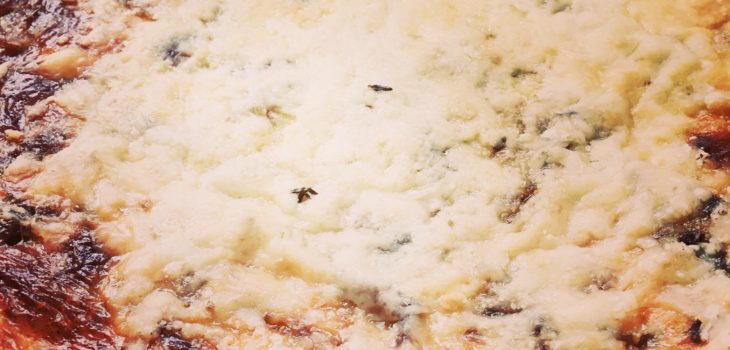
Caramelised Onion and Cheese Quiche (with a gluten-free cheese…

  • 30th July 201830th July 2018
  • by thefoodwife

Serves 6-8

Whilst cheese and onion is a classic combination, caramelising the onions with a little balsamic vinegar adds a beautiful sweetness. Enhancing the pastry with cheese and wholegrain mustard gives an extra flavour kick and helps liven up the gluten-free crust.

Now, if you are looking for a quiche recipe and don’t need it to be gluten-free, then by all means make a regular shortcrust pastry by omitting the xanthan gum, replacing the gluten-free plain flour with regular flour, leaving out the eggs and just using a little water to bind it.

I used a vintage gruyere in the pastry and as half of the cheese topping. I used vintage cheddar in the filling and as the other half of the topping. You don’t need to use a mix, but I would recommend using a strong hard cheese to make sure the flavour comes through.

  • Ingredients:
  • For the pastry:
  • 350g gluten-free plain flour
  • 1/2 tsp xanthan gum
  • 125g cold unsalted butter, cut into small cubes
  • 25g gruyere, grated (or other hard cheese of your choice)
  • 1 heaped tsp wholegrain mustard
  • 2 eggs, beaten
  • For the caramelised onions:
  • 2 tbsp olive oil
  • 4 small or 2 medium red onions
  • Pinch salt
  • 1 tbsp balsamic vinegar
  • For the filling:
  • 4 eggs
  • 150ml milk
  • 60g grated vintage cheddar
  • Pinch of salt and white pepper
  • For the topping:
  • 50g grated cheese (I used a mix of gruyere and vintage cheddar)
  • Pinch of thyme

Step 1: Make the pastry. Rub the butter and cheese in to the flour and xanthan gum until it resembles breadcrumbs.

Step 2: Add the mustard to the beaten egg and pour in to the breadcrumbed flour. Mix with your hands until combined and then roll or press out until about 4-5mm thick.

Step 3: Butter a loose-bottomed flan tin (20-25cm) and press the pastry into it; the gluten-free pastry is likely to tear, but patch it up to ensure there are no gaps.

Step 4: Leave to chill in the fridge for 30 minutes. Whilst this is chilling, caramelise your onions.

Step 5: Put the oil in a frying pan on a medium-low heat. Add the sliced onions and cook gently for 15 minutes, stirring occasionally.

Step 6: Add a pinch of salt and continue to cook for another five minutes on a gentle heat.

Step 7: Add the balsamic vinegar and stir for two minutes.

Step 8: Turn off the heat and allow to cool.

Step 9: Preheat the oven to 180c. Place baking parchment on top of the pastry along with baking beads or dry rice and blind bake in the oven for 20 minutes.

Step 10: Whisk the four eggs with 60g of grated cheese, the milk, a few of the thyme leaves, and the salt and pepper.

Step 11: Remove the pastry from the oven and carefully take out the beads and paper.

Step 12: Spread the cooled caramelised onions over the base and sprinkle over a few of the thyme leaves.

Step 13: Carefully pour over the egg mixture and return to the oven for 20 minutes.

Step 14: Sprinkle over the 50g of grated cheese(s) and the remaining few thyme leaves. Return to the oven for 15 minutes.

This can be served hot, warm or cold. If you make it in advance but would like to serve it hot, reheating it at 160c for 20 minutes should do the trick.
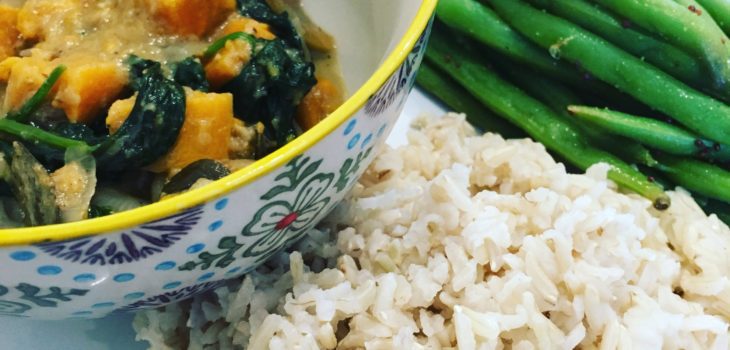
Sweet Potato and Spinach Curry

  • 27th July 201827th July 2018
  • by thefoodwife

Serves 6-8

Creamy, sweet and spicy, this is a lovely curry that is cheap to make and is really satisfying. As well as tasting great, it is rich in iron from the spinach and vitamin C from the sweet potato. Using coconut oil and coconut milk rather than ghee and cream or yogurt keeps this vegan-friendly and is not bad from a diet point of view either as the quantities of these between the portions are small.

As long as your baby likes spices, this is great for them too; just siphon theirs off before seasoning at the end, and you could blend it before serving. You could add a little cooling full fat yogurt stirred into their curry if needed.

  • Ingredients:
  • 2 tsp coriander seeds
  • 2 tsp fennel seeds
  • 4 green cardamom, seeds only (pod removed)
  • 1 dsp coconut oil
  • 2 onions, halved and sliced
  • 2 inch piece of ginger, grated
  • 3 cloves garlic, crushed
  • 1/2 tsp chilli powder
  • 1 heaped tsp garam masala
  • 3 medium sweet potatoes, peeled and cut into 1.5cm cubes
  • 300ml veg stock
  • Large pinch of dried curry leaves
  • 250g spinach, washed
  • 165ml coconut milk
  • Salt and pepper to taste.

Step 1: Toast the coriander, fennel and cardamom spices and then blend in a spice grinder or pestle and mortar.

Step 2: Add the coconut oil to a large pan on a medium heat. Add the onions and cook gently for 10-15 minutes until softened, but not browned.

Step 3: Add the ginger and garlic and cook for a further two minutes, stirring frequently.

Step 4: Add the freshly ground spices and cook for another five minutes, stirring frequently.

Step 5: Add the chilli powder and garam masala and stir, cooking for a couple of minutes.

Step 6: Add the cubed sweet potato along with the stock and curry leaves . Cover with a lid and cook for ten minutes on a gentle simmer.

Step 7: Add the coconut milk, replace the lid and simmer until the sweet potato is softened (about another ten minutes).

Step 8: Add your spinach, stir, and replace the lid for two minutes.

Step 9: Season to taste and serve.

I served this with nutty brown basmati rice and some spiced homegrown green beans. I simply blanched the beans until tender in boiling water and then lightly fried them for a couple of minutes in a little coconut oil, a teaspoon of brown mustard seeds and a teaspoon of ground cumin, and a squeeze of fresh lemon juice at the end.

Harissa Hummus

  • 23rd July 201828th July 2018
  • by thefoodwife

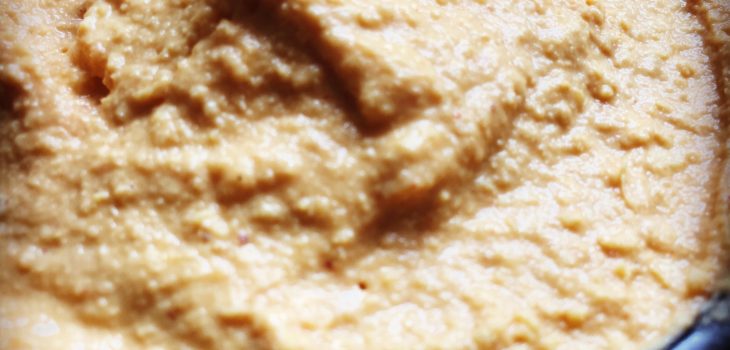
We’ve always got a tub of hummus in our fridge at the moment because it’s one of the Food Baby’s favourite things to eat.

This weekend I decided to make my own, and I took the opportunity to make it, as you’ll spy from the ingredients list, without any added olive oil, so as to be diet-friendly for me. You can, of course, add olive oil to your own, but try adding a tablespoon at a time and tasting as you go.

Likewise, I decided a kick of spice was in order so added harissa paste; again, this is optional and could be left out or replaced with a flavour of your choosing (why not try a spoonful of pesto, a roasted red pepper, a few sun dried tomatoes or some toasted cumin).

Once made this will last a few days in the fridge.

  • Ingredients:
  • 1 heaped tbsp tahini
  • Juice of one lemon
  • 2 cloves of garlic, roughly chopped
  • 1 tin of chickpeas, drained
  • 2 tsp harissa paste
  • 1 pinch of salt (leave out if this is for baby)
  • 40-100ml cold water

Step 1: Blend the tahini, lemon juice and garlic in a food processor (or with a stick blender).

Step 2: Add the drained chickpeas and blend again until smooth (to make it extra smooth you could skin the chickpeas, but I think life is too short for such things!)

Step 3: Add the harissa paste (or flavourings of your choice) and salt and blend again, and add the water as you do so (add gradually to get your desired consistency). Add any oil at this stage if you so wish.

Store in a sealed container in the fridge.

Rhubarb Gin Fizz

  • 20th July 201820th July 2018
  • by thefoodwife

Makes 1 cocktail

So today I finished work as a teacher, not just for the summer holidays but for the foreseeable future. After ten years at the same establishment, it’s feels a bit odd but I’ve known for a while that I’ve needed a break from teaching and with the arrival of The Food Baby it seemed like the best time to make the break.

To celebrate, I have decided to crack in to my newly brewed Rhubarb Gin and have decided a cocktail is in order. So here is a recipe for a Rhubarb Gin Fizz.

  • Ingredients:
  • 50ml rhubarb gin
  • 125ml chilled sparkling wine

Step 1: Pour the measure of rhubarb gin into a fluted glass and top up with a sparkling wine of your choice.

Step 2: Drink.

Rhubarb Gin

  • 20th July 201820th July 2018
  • by thefoodwife

Makes approx 900ml

Rhubarb is one of my favourite flavours. I’m also rather partial to gin. Marry the two together? Sign me up!

This takes four weeks to brew (boo!) but the good news is it is quick to put together. You need only four things: a good quality gin, raw rhubarb, caster sugar and a large, sealable vessel (I used a 2l mason jar). Also, don’t forget to keep your empty gin bottle to decant back in to afterwards.

If you use forced rhubarb the result will be beautifully bright pink, or use regular rhubarb, as I did, and you are left with a more subtle shade, but either way the flavour is all there!

  • Ingredients:
  • 240g white caster sugar
  • 600g rhubarb, cut in to 2-3 inch pieces
  • 70cl good quality gin

Step 1: Combine the three ingredients in your container and seal.

Step 2: Leave for four weeks, shaking every few days to mix everything up.

Step 3: After four weeks, strain the liquid and decant into your gin bottle (you will make slightly more than the original amount of gin so make sure you’ve got an extra bottle to decant the last little bit into).

Posts pagination

Previous page 1 … 41 42 43 44 45 … 51 Next page

Newsletter

Blog Search

Blog Categories

  • Air fryer 2
  • Alcohol 12
  • Baby Weaning 24
  • Baking 74
  • Beef 18
  • Bread 1
  • Brunch 7
  • Cake 47
  • Chicken 48
  • Christmas 14
  • Cocktails 9
  • Dairy-Free 228
  • Dessert 37
  • Duck 1
  • Fish 12
  • Gluten-Free 254
  • Instant Pot 19
  • Lamb 6
  • Lunch box fillers 2
  • Ostrich 1
  • Pasta 4
  • Pescatarian 13
  • Pork 38
  • Rabbit 1
  • Salad 9
  • Shellfish 10
  • Soup 1
  • Turkey 10
  • Uncategorised 6
  • Vegan 136
  • Vegetarian 243

Socials

  • Facebook
  • Twitter
  • Google
  • Linkedin
  • Instagram
  • Pinterest
  • Youtube
Theme by Colorlib Powered by WordPress
Back to top