Skip to content
The Food Wife logo
  • Home
  • About
  • Blog
  • Contact

Category: Gluten-Free

Katsu Curry

  • 13th June 201818th June 2018
  • by thefoodwife

Serves 4

If I’m going for Japanese, and not eating sushi, then it is very likely I’ll opt for a katsu curry. Referring to the breaded and fried meat or tofu, katsu is served with a fruity curry sauce and a sticky rice.

At home I’ve been researching recipes for the curry sauce as I had already decided that I wanted to have a go at making a lower calorie katsu by cheating on the frying element (by just using frylight and a non-stick pan). I knew I wanted to use apples in my recipe and I also wanted to make sure that it could be both vegan and gluten-free if required. I succeeded in adapting the recipes to make this version which I was really pleased with.

It is really quick to make (it only took about 20 minutes) and I made it earlier in the day so I only had to reheat it in the evening whilst I was frying my tofu. I have included a description of how I created the katsu element at the end of this recipe, and whilst this is not gluten-free/vegan, it could be adapted by using gluten-free flour, aquafaba (the thick water found in a tin of chickpeas that is often used as a vegan egg-replacement) and gluten-free bread crumbs if necessary.

  • Ingredients:
  • 1 tbsp coconut oil
  • 1 onion, diced
  • 2 carrots, peeled and grated
  • 2 Granny Smith apples, peeled, cored and roughly diced
  • 3 cloves garlic, finely diced
  • 1 heaped tbsp tomato purée
  • 1 tbsp soy sauce (gluten-free if required)
  • 2 tsp caster sugar
  • 1 tbsp cornflour, slackened in a little cold water
  • 2 heaped tsp of curry powder (I used medium strength)
  • 1/2 tsp ground ginger
  • 350ml hot vegetable stock (gluten-free if required)
  • A drop of sesame oil
  • Salt and pepper

Step 1: Melt the coconut oil on a medium heat in a frying pan and add the onion, carrot and apple. Put a lid on the pan and cook for eight to 10 minutes until they are softened (you may need to stir or shake the contents a couple of times).

Step 2: Whilst this is softening add the sugar, soy sauce and tomato purée to the slackened cornflour and stir. Set to one side.

Step 3: Remove the lid and add the garlic and cook for a minute, followed by the two spices, stirring for 30 seconds.

Step 4: Add the vegetable stock and stir followed by the cornflour mix and stir. Add a tiny drop of sesame oil. Lower the heat and let it simmer for four or five minutes.

Step 5: Blend the mixture to a thick purée. Season to taste with salt and pepper.

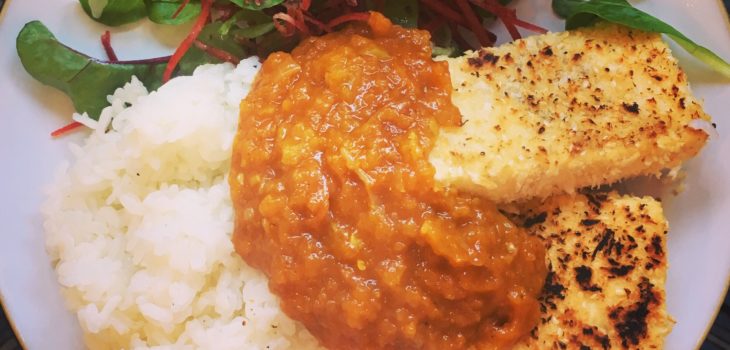
I served this with a low calorie, low fat version of tofu katsu, but there is no reason why you couldn’t follow the same method with chicken or pork.

I used a firm tofu and cut slices 1cm-1 1/2 cm thick, pressed them on kitchen paper to remove the excess moisture and then panéd them by first dusting them in seasoned flour, dipping them in beaten egg (if you wanted to make this strictly vegan then replace the egg with aquafaba) and then coating on a mix of panko breadcrumbs and sesame seeds. I fried them in a non-stick pan with just a spray of fry-light, cooking them on a medium heat for three-four minutes on each side. I served two of these slices with some sticky sushi rice and a small salad on the side.

Roast Chicken with Preserved Lemons

  • 11th June 201811th June 2018
  • by thefoodwife

I always try to buy free-range chicken; if I’m going to eat meat it makes me feel better as a consumer and also I think it tastes better, so it’s a win win. The last couple of times we’ve had a whole roasted chicken I have stuffed the inside with preserved lemons. They provide a delicate flavour to the flesh and enhance the caramelised juices with a salty citrus hit.

Roasting a chicken is a simple and fuss free way of cooking and can feed several people in one sitting. Alternatively it can provide the basis for two or three meals for a couple of people (try the leftovers shredded into my Asian Noodle Peanut Salad).

  • Ingredients:
  • 1 free-range whole chicken (giblets removed)
  • 2 or 3 preserved lemons, halved
  • Salt and pepper

Step 1: Place the chicken in a roasting tray and insert the preserved lemons inside the bird through the opening at one end.

Step 2: Sprinkle the skin with salt and pepper.

Step 3: Place in a preheated oven at 190c and cook for 45 minutes per kilogram plus a further 20 minutes.

Step 4: Once cooked, remove the chicken from the oven and leave to rest for a good 20 minutes before carving.

Serve as a classic roast dinner, or enjoy in the summer with a warm potato salad and a green salad.

Roasted Vegetable and Feta Quinoa Salad

  • 8th June 20188th June 2018
  • by thefoodwife

Serves 4

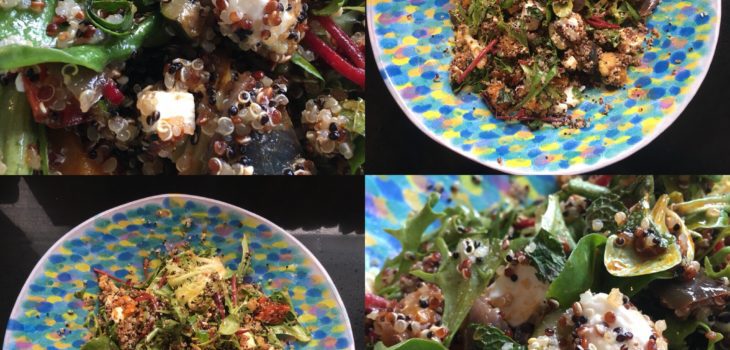
This is a more substantial salad that provides a spicy smoky hit from the dressing. It makes a good lunch served with some flat breads or some fried halloumi (use the method in my recipe here).

The dressing makes enough for two salads (so by all means halve the quantities) but it will keep in the fridge in a jar for a week or two.

It’s quite convenient to use left over roasted vegetables in this dish; I made a big batch the day before and then kept back the amount I needed for the salad. I used a mix of pepper, red onion, butternut squash, tomatoes, cauliflower, courgette and aubergine, all cut into roughly one inch pieces, tossed in oil and some seasoning, and roasted for 30-40 minutes at 190c.

  • Ingredients:
  • For the salad:
  • 200g mixed roasted vegetables
  • 120g quinoa (I used a mixed variety)
  • 100g feta, cubed
  • 50g mixed salad leaves
  • 3 sprigs of mint, leaves chopped or torn
  • For the dressing:
  • 6 tbsp olive oil
  • 2 tbsp red wine vinegar
  • 2 tbsp pomegranate molasses
  • 2 heaped tsp harissa paste

Step 1: Put all the dressing ingredients in a jar (with a lid) and shake until combined, or whisk in a bowl.

Step 2: Place the salad ingredients in a large bowl and toss. When ready to serve, drizzle over half of the dressing and toss again.

Bibimbap

  • 6th June 20186th June 2018
  • by thefoodwife

Serves 2

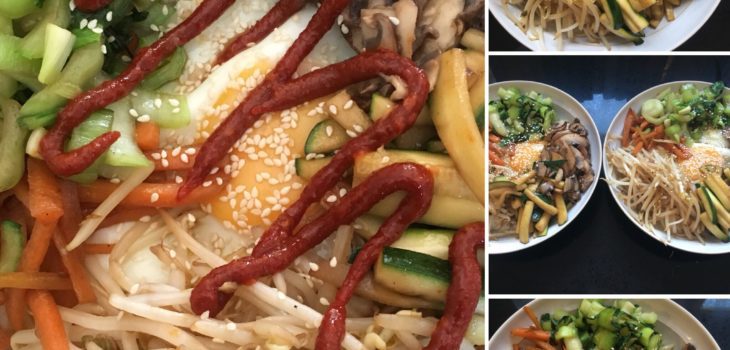
Following on my Asian theme, we also enjoyed a vegetarian bibimbap last weekend. For those who have not experienced this dish, it is Korean and means ‘mixed rice’. Essentially it consists of white rice, egg, vegetables and if you like, some meat, often beef. And of course the spicy gochujang (my favourite!)

This weekend we stuck to a veggie version and I’ve included exactly what we had, but don’t be afraid to try a different combination of vegetables. Whatever you fancy really!

  • Ingredients:
  • 150g rice (I used sushi rice)
  • 1 carrot, peeled and cut into matchsticks
  • 1/2 courgette, cut into matchsticks
  • 2 handfuls of beansprouts
  • 6 mushrooms, thinly sliced (I used chestnut mushrooms)
  • 2 pak choi, finely shredded
  • 2 large eggs
  • Sesame oil
  • Soy sauce (gluten-free if required)
  • To serve:
  • 1 tsp sesame seeds
  • Squeezable gochujang for bibimbap (if you are making this gluten-free you will need ensure you are using a gluten-free version)

Step 1: Cook your rice according to the packet instructions.

Step 2: Heat your wok to a medium high heat and add a small amount of sesame oil and one of your prepared vegetables and stir fry for a minute or two, until cooked but still having a little bite. Add a splash of soy sauce 20 seconds before removing from the heat. Remove the vegetables from the wok, and keep separately. Repeat with your other vegetables. I’d recommend leaving the mushrooms till last as they release a lot of natural juice.

Step 3: When your vegetables are all cooked and kept separately, fry each of your eggs.

Step 4: Assemble your bibimbap bowls by first putting your cooked rice at the bottom of the bowl. Top the rice in the middle with your fried egg, then arrange each of the vegetables around the bowl, keeping the yolk of the egg visible.

Step 5: Sprinkle with a few sesame seeds and as much gochujang as you would like and tuck in!

Any vegetables can be used in this dish, all cooked in the same way. This dish is also amazing with a meat accompaniment such as minced beef. Again, you would cook the meat in the same way as the vegetables, and arrange it in the bowl as you do the vegetables.

Lamb Chops – Greek Style

  • 28th May 201828th May 2018
  • by thefoodwife

Serves 2

This is a really quick and easy way to prepare and cook lamb which leaves you with deliciously flavoursome meat that can be done under a grill or (if the weather allows it!) on a barbecue.

The combination of olive oil, oregano, lemon and garlic sings of Greece and the quantities here can be easily scaled up.

  • Ingredients:
  • 4 lamb chops
  • 1 tbsp olive oil
  • 1 unwaxed lemon (zest and juice)
  • 2 cloves garlic (crushed)
  • 1 tsp dried oregano
  • Pinch each of salt and pepper

Step 1: Combine all the ingredients in a sealable bag or in a dish covered with cling film.

Step 2: Marinate for at least half an hour in the fridge.

Step 3: Remove from the fridge for 20 minutes before cooking.

Step 4: Cook under a hot grill or BBQ for a few minutes on each side (approximately three minutes a side for medium/four minutes for medium-well/five minutes for well). Rest for two minutes before serving.

This is good with herby potatoes and salad. I also like it with Greek yogurt on the side with fresh mint stirred through it.

Posts pagination

Previous page 1 … 45 46 47 48 49 … 51 Next page

Newsletter

Blog Search

Blog Categories

  • Air fryer 2
  • Alcohol 12
  • Baby Weaning 24
  • Baking 74
  • Beef 18
  • Bread 1
  • Brunch 7
  • Cake 47
  • Chicken 48
  • Christmas 14
  • Cocktails 9
  • Dairy-Free 228
  • Dessert 37
  • Duck 1
  • Fish 12
  • Gluten-Free 254
  • Instant Pot 19
  • Lamb 6
  • Lunch box fillers 2
  • Ostrich 1
  • Pasta 4
  • Pescatarian 13
  • Pork 38
  • Rabbit 1
  • Salad 9
  • Shellfish 10
  • Soup 1
  • Turkey 10
  • Uncategorised 6
  • Vegan 136
  • Vegetarian 243

Socials

  • Facebook
  • Twitter
  • Google
  • Linkedin
  • Instagram
  • Pinterest
  • Youtube
Theme by Colorlib Powered by WordPress
Back to top