Skip to content
The Food Wife logo
  • Home
  • About
  • Blog
  • Contact

Category: Vegetarian

Chicken Versus Chickpea

  • 5th June 201910th June 2019
  • by thefoodwife


Last weekend I had the pleasure of going to Bradford-on-Avon’s first food and drink festival. What a success. The weather was glorious and we spent the entire day visiting a range of food and drink producers, tasting their wares (The Food Baby was in snack heaven!) and making purchases of cheese, salami and peanut butter.  There were also live demonstrations from chefs including Jane Devonshire and Ping Coombes, both Masterchef winners. They showcased recipes from their cookbooks which looked mouth-wateringly delicious and I’ll definitely be giving them a go. Jane’s book, Hassle Free Gluten Free, is endorsed by Coeliac UK and her demonstration of the Peanut Butter Cheesecake (you can find the recipe here) just ticked all the boxes, particularly as its gluten-free status means The Food Husband can eat it (and contains his favourite ingredients!)

So I decided that this week I would revisit some of my gluten-free recipes starting with my Sticky Chilli Chicken

(Serves 4-6)

Ingredients:

1kg chicken pieces (a mix of thighs and drumsticks)

1 red onion cut into thin wedges

2 carrots cut into batons

1 red pepper cut in to one inch pieces

1/2 orange cut into eight pieces

Juice of half an orange

1 inch ginger peeled and diced

1 heaped tbsp chilli jam

2 heaped tbsp apricot jam

2 tbsp maple syrup

1 tbsp red wine vinegar

Step 1: Add all ingredients into a large sealable bag (I like using the large ones from IKEA – I’m sure you know the ones I mean, they are frequently listed as a must-have purchase when paying the big blue box a visit). Squish everything together so the meat and vegetables are pleasingly coated in the sticky mixture. Leave (preferably overnight) in the fridge to marinate.

Step 2: Spread the contents of the bag in a baking tin and put in a 190c oven for 50 minutes.

Serve with rice, and if you fancy some extra veg, some steamed greens.

And for those looking for a meat-free meal then give my Chickpea and Preserved Lemon Tagine a go. 

(Serves 6)

Ingredients:

2 tbsp oil

1 onion, large dice

2 heaped tsp ras al hanout

2 cloves of garlic, finely chopped

1 pepper, large dice

2 pieces of cassia bark/cinnamon sticks

2 tins of chopped tomatoes

2 tins of chickpeas

10 prunes, quartered

2-3 preserved lemons, finely chopped

Salt and pepper

Step 1: Soften the onion in the oil for five minutes on a medium heat.

Step 2: Add the ras al hanout and stir for one minute.

Step 3: Add the garlic and diced pepper and stir for another minute.

Step 4: Add the tinned tomatoes, chickpeas, cassia/cinnamon, prunes and preserved lemons. Simmer for 20 minutes. Season to taste.  If you wanted to make this in a proper tagine in the oven then you can of course, it’ll just take a lot longer! At this point transfer it to your tagine and cook at 150c for an hour or two.

We had this with quinoa and a fat-free yogurt, spiced up with some garam masala (simply stir a teaspoon of the spice mix through a few tablespoons of the yogurt). You could also have some salad or vegetables on the side.


What’s Cooking?

  • 21st May 201923rd May 2019
  • by thefoodwife

If you’re looking for some culinary inspiration here’s a round up of some of the recipes from The Food Wife that we’re having this week. 

Pizza, The Food Husband’s favourite, has been off the menu for a while as he’s eliminating gluten from his diet, but I made up a batch of sourdough pizza bases with the addition of two teaspoons each of garlic powder and dried oregano to the dough. I had a go at a potato base for a gluten-free version, which was a big hit (think giant gnocchi base). Watch this space for the recipe as I try to recreate it next time pizza is on the menu.  

We’re still working our way through the jars of wild garlic pesto I made recently, and tomorrow we’ll be enjoying it simply with pasta and green beans for a light and summery meal.  I’ll also be adding it as a topping to a salmon fillet before roasting it in the oven another evening this week.

The Food Baby has not been forgotten either. Still in the quest to smuggle more vegetables into his diet (he can spot a pea from the other side of the room) I’ve batch-cooked a tomato and carrot pasta sauce and a three bean chilli along with a double batch of cheese and vegetable scones for the freezer. This time using grated parsnip, carrot and broccoli along with chopped spinach and sundried tomatoes, he devours them without the knowledge that I’m getting sneaky veg inside him!

And finally if, like me, you love rhubarb, then you’ll be loving the abundance of it at the moment. Why not give my rhubarb crumble traybake a go, or if you can wait a while, have a go at my rhubarb gin. It’s worth the wait!

Lychee Cocktail

  • 19th May 2019
  • by thefoodwife

Makes 1

A recent Vietnamese meal with the girls led me to come up with this as our first drink of the night. It went down well and looked pretty with its borage flower accompaniment. The puréed lychees left some residue on the glass, but you could avoid this by passing the purée through a sieve before using, but sometimes life is too short.

The quantities below are for a large champagne flute, but if using smaller ones then halve the quantity of liqueur and purée.

Ingredients:

40 ml lychee liqueur (I used a lychee infused white rum)

20ml lychee purée (I whizzed up a tin of lychees with a splash of their syrup) 

Chilled sparkling wine (I used Prosecco)

To serve: an edible flower frozen in an ice cube (optional) (I used borage)

Step 1: Measure the liqueur and purée into a glass, add the flower ice cube (if using) and carefully top up the glass with sparkling wine. Serve immediately.

Oat Milk

  • 3rd May 201919th May 2019
  • by thefoodwife

Makes 750ml

The Food Husband is currently eliminating dairy from his diet so here is a homemade oat milk (far cheaper than any you can buy from the shops), which can be made in 30 minutes or left over night, with very little to do from you (just make sure your blender is big enough!).

‘Specialist’ equipment needed is a blender and a muslin cloth, otherwise it’s just oats and water. You can also use the blended oats afterwards; I made a porridge (of sorts) for The Food Baby, but I could have also used them in his Baby Oaty Cookies.

  • Ingredients:
  • 1 cup/100g of oats (gluten-free if required)
  • 3 cups/750ml cold (filtered) water

Step 1: Begin by soaking the oats in water for at least half an hour (you can always leave them over night to have fresh ‘milk’ in the morning).

Step 2: Drain the soaked oats, discarding the water.

Step 3: Add 750ml of fresh water to the drained oats and then blend.

Step 4: Pour the blended oat milk through a piece of muslin cloth, collecting the liquid in a jug or bowl which can then be decanted into a bottle and stored in the fridge for up to five days. Sweeten as required.

Remember to shake the oat milk before serving as sediment will rest at the bottom.

For a richer, creamier milk, try blending a tablespoon of coconut oil with the milk.

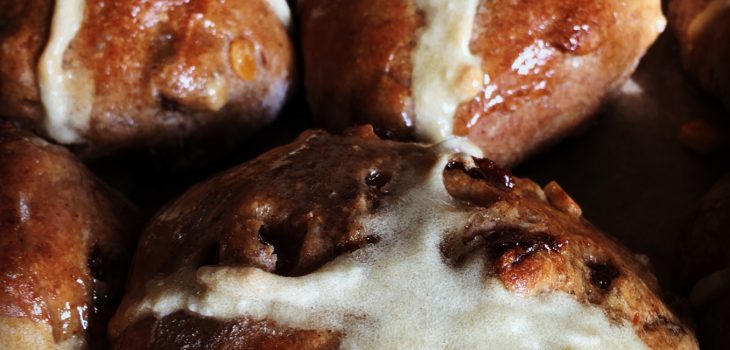
    Dairy-Free, Vegan, No-Knead Sourdough Hot Cross Buns

    • 18th April 201919th May 2019
    • by thefoodwife

    Makes 12

    I made my first sourdough starter back in December. Named Cuthbert, he has gone on to make regular loaves and pizza dough without any need for yeast.

    This Easter I decided to use him as the base of my hot cross buns. I’ve opted for a no-knead method. Essentially a 24 hour process with very little human input and no need for any machinery to produce the dough.

    This year I’ve gone for a dairy-free bun, due to dietary requirements, but these can be made with butter if no such requirements are needed.

    They can also be made in advance and frozen; simply defrost for a few hours before re-heating or splitting and toasting.

    • Ingredients:
    • 330g recently fed sourdough starter (fed 2-3 hours before using)
    • 80ml/g vegetable oil (or melted butter if you’re not making these vegan/dairy-free)
    • 300ml luke-warm water
    • 10g salt
    • 50g caster sugar
    • 250g strong white bread flour
    • 250g strong wholemeal bread flour
    • 30g mixed spice
    • 200g dried fruit (I used 150g sultanas and 50g of candied peel)
    • For the crosses:
    • 50g plain flour
    • Water
    • For the glaze:
    • 25g caster sugar
    • 25ml water

    Step 1: Begin by placing the bubbling starter in a large bowl, add the oil, water, salt, sugar, mixed spice and flours and use a wooden spoon to mix into a combined dough. This will not take long and will be a rather wet mix. Cover the bowl with cling film or a damp tea towel and leave for an hour.

    Step 2: Uncover the dough and start folding the sides into the middle. Add the dried fruit as you go. Keep rotating the bowl, moving the outside in until you have done about 20 folds. Re-cover and leave, revisiting three more times over the next few hours to turn and fold a few times each visit. Each time the dough should have risen slightly and become smoother.

    Step 3: Cover and leave in a cool place to prove over night.

    Step 4: The next morning you should have a smooth, well risen dough. Tip out onto a lightly floured surface and divide into 12 pieces (I cut in half, divided each half in two and then each quarter into three).

    Step 5: Line a baking sheet with parchment and roughly shape each piece into a ball and place on the baking sheet.

    Step 6: Mix the paste for the crosses by combining the flour with a little water until a smooth paste is formed. Place in a piping bag and pipe crosses across each bun (each row can be piped as a continuous line).

    Step 7: Bake in a preheated oven (200c/190c fan) for 25 minutes, or until browned, risen and have a hollow sound when tapped underneath. Make the glaze whilst they are baking by heating the water and sugar to a bubbling syrup in a saucepan.

    Step 8: Brush each bun with the glaze and allow to cool.

    These are best eaten warm. Either eat fresh from the oven, re-heat in the oven or split and toast. They can be frozen too; just make sure to remove and defrost a few hours before needed.

    Posts pagination

    Previous page 1 … 27 28 29 30 31 … 49 Next page

    Newsletter

    Blog Search

    Blog Categories

    • Air fryer 2
    • Alcohol 12
    • Baby Weaning 24
    • Baking 74
    • Beef 18
    • Bread 1
    • Brunch 7
    • Cake 47
    • Chicken 48
    • Christmas 14
    • Cocktails 9
    • Dairy-Free 228
    • Dessert 37
    • Duck 1
    • Fish 12
    • Gluten-Free 254
    • Instant Pot 19
    • Lamb 6
    • Lunch box fillers 2
    • Ostrich 1
    • Pasta 4
    • Pescatarian 13
    • Pork 38
    • Rabbit 1
    • Salad 9
    • Shellfish 10
    • Soup 1
    • Turkey 10
    • Uncategorised 6
    • Vegan 136
    • Vegetarian 243

    Socials

    • Facebook
    • Twitter
    • Google
    • Linkedin
    • Instagram
    • Pinterest
    • Youtube
    Theme by Colorlib Powered by WordPress
    Back to top