Skip to content
The Food Wife logo
  • Home
  • About
  • Blog
  • Contact

Category: Vegan

Spiced Roasted Cauliflower Salad with a Yoghurt Dressing

  • 26th March 202426th March 2024
  • by thefoodwife

Serves 2-4

This was a happy lunch, made when I looked in the fridge and saw a rather sad cauliflower, half a swede and a bit of savoy cabbage, that all needed using immediately or it would be going in the compost. Waste not want not!

The result, a spiced warm salad that was delicious! It would have served two people as it was or would stretch to four with the addition of a flatbread each on the side.

You can use whatever veg you have to hand to compliment the cauliflower. I had 1/2 a swede but a butternut squash would have been great too. If you had a sweet potato or peppers that needed eating they too could have joined in.

A great, one-pan, warming salad. Give it a go!

Ingredients:

1 large cauliflower cut into florets about 2 inches long

1/2 butternut squash/swede peeled and cut into 1 inch pieces

Red onion, sliced (fresh or pickled)

Coriander or flat leaf parsley

2 tbsp Pomegranate seeds

1 tbsp Olive oil

2 tbsp Ras Al Hanout

4 tbsp Plain yoghurt (vegan if required)

Step 1: Preheat your oven to 180c (fan). Spread the cauliflower and butternut squash or swede, along with any other veg your using, onto a baking tray, drizzle with the oil and the ras al hanout (reserving 1 tsp for the yoghurt dressing). Toss together and bake for 50 minutes, giving everything a shake/turn half way through cooking.

Step 2: Mix together the yoghurt and reserved ras al hanout. Set to one side to use as the dressing.

Step 3: Allow the vegetables to cool a little and plate up when they are warm. Either dress one plate that everyone can help themselves from or plate up individually.

Step 4: Spread the warm vegetables on their serving plate and dress with a few slices of the red onion, the pomegranate seeds and a few torn parsley or coriander leaves. Finish by drizzling with the spiced yoghurt dressing.

Serve immediately.

Chocolate Sprinkle Lollies

  • 10th March 202410th March 2024
  • by thefoodwife

Such a great make with kids (or without!) and as my six-year old declared “these are super easy!” So no excuse not to make them!!

These are totally adaptable to your dietary requirements, just make sure your ingredients are suitable; gluten-free/vegan/vegetarian (be careful on the sprinkles – some are made with gluten/animal products) .

All you need is your chocolate of choice, sprinkles, lolly sticks, grease proof paper, a baking tray and a fridge or freezer…

Ingredients:

200g chocolate (gluten-free/vegan as required)

Sprinkles (gluten-free/vegan as required)

10 lolly sticks

Step 1: Prepare a baking tray with grease proof paper. Make sure the tray will fit flat in your fridge or freezer.

Step 2: Melt the chocolate in a bowl, either in the microwave (30 seconds at a time, stirring in between each increment). Stop shortly before all pieces are melted and then stir until smooth. Alternatively melt in a bain marie.

Step 3: Use a dessert spoon to make a thin circle of chocolate (about 4cm diameter) and then place a lolly stick into the centre. Repeat until you have made 10. Then put in the freezer (or fridge) until set (just a couple of minutes in the freezer).

Step 4: Remove the tray from the freezer and repeat a thicker circle over each lolly so you have a neat lolly. Cover with sprinkles and then return to the freezer, until set.

Try not to eat them all at once, instead store them in a tub in the fridge.

Store the lollies in a sealed tub in the fridge

Cheeky Biscoff Twists

  • 21st December 202321st December 2023
  • by thefoodwife

Makes 10 twists

These couldn’t be easier and only need 2 ingredients and 20 minutes.

Ingredients:

1 sheet of ready rolled puff pastry

2 heaped tbsp of smooth biscoff spread (I heated it for 30 seconds in the microwave to make it runny)

Optional: Icing sugar to serve

Step 1: Preheat the oven to 200c (fan) and line a large baking tray.

Step 2: Take the sheet of ready rolled puff pastry, spread half of it with the biscoff spread then fold the other half on top.

Step 3: Cut into 10 equal strips, and twist!

Step 4: Spread on the lined baking tray and bake for 18 mins.

Step 5: Dust with icing sugar and serve!

Chocolate Bourbon Tiffin

  • 21st November 202321st November 2023
  • by thefoodwife

Makes 16 squares

I love tiffin. It’s also known as refrigerator cake, as there’s no baking required. Setting the cake in the fridge results in a rich biscuity chocolate concoction, studded with other sweet treats. Adaptations are listed below to make these vegan and/or gluten-free.

Ingredients:

150g butter/vegan baking block

75g caster sugar

75g golden syrup

30g cocoa powder

150g chocolate bourbon biscuits (gluten-free/vegan if required), crushed to a mix of powder and chunks

2 handfuls of sultanas

2 handfuls of mini marshmallows (gluten-free/vegan if required)

100-200g dark and/or milk chocolate (gluten-free/vegan if required), melted.

Optional: I’ve made mine extra special with two tubes of Rolos (these should be gluten-free but unfortunately are not vegan)

Step 1: Line an 8×8 inch baking pan with grease proof paper.

Step 2: Over a medium low heat, melt the butter, sugar, syrup and cocoa together until smooth, remove from the heat and allow to cool slightly.

Step 3: In a bowl combine the crushed bourbon biscuits, sultanas, marshmallows and rolos (if using) and then stir through the cooled molten cocoa mix until fully combined.

Step 4: Tip into the lined pan and press out until it is in one smooth and level layer. Place in a fridge to set for half an hour.

Step 5: Smooth over the molten chocolate (100g will give a thin layer, 200g a thicker) and cover and place in the fridge to set for a couple of hours until everything is firm. Once fully set, cut into 16 squares using a hot knife.

Store in a sealed container in the fridge for up to a week.

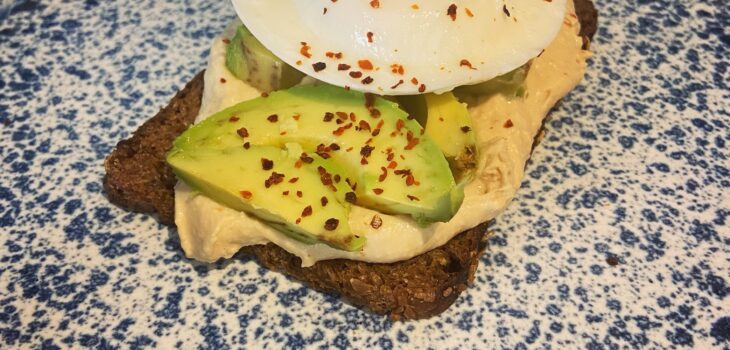
Hummus, Avocado and Egg, on Rye

  • 5th November 20235th November 2023
  • by thefoodwife

Serves 1

This is my go-to savoury breakfast at the moment. Once you’ve made a batch of the (garlic-free for breakfast!) cannellini bean hummus then it’s just a few minutes each morning to whip up a truly satisfying plate.

This isn’t so much a recipe, as a list of instructions!

Ingredients:

1 slice of rye bread, toasted (or bread if your choosing, gluten-free if required)

1 heaped tbsp of (cannellini bean) hummus

1/2 a ripe avocado, sliced

1 egg, cooked how you like it – I’d suggest poached but fried also good (leave off for the vegan option!)

Step 1: Once the rye bread is toasted, place in the middle of your plate. Spread the hummus atop.

Step 2: Lie the slices of avocado across the hummus. Top with your cooked egg (if using).

I also like a sprinkling of Aleppo pepper as a garnish, but can also recommend a drizzle of siracha!

N.B. If making the Cannellini Bean Hummus I’d recommend draining most of the liquid from the can for this dish so you have a nice thick hummus.

Posts pagination

Previous page 1 2 3 4 5 6 … 28 Next page

Newsletter

Blog Search

Blog Categories

  • Air fryer 2
  • Alcohol 12
  • Baby Weaning 24
  • Baking 74
  • Beef 18
  • Bread 1
  • Brunch 7
  • Cake 47
  • Chicken 48
  • Christmas 14
  • Cocktails 9
  • Dairy-Free 228
  • Dessert 37
  • Duck 1
  • Fish 12
  • Gluten-Free 254
  • Instant Pot 19
  • Lamb 6
  • Lunch box fillers 2
  • Ostrich 1
  • Pasta 4
  • Pescatarian 13
  • Pork 38
  • Rabbit 1
  • Salad 9
  • Shellfish 10
  • Soup 1
  • Turkey 10
  • Uncategorised 6
  • Vegan 136
  • Vegetarian 243

Socials

  • Facebook
  • Twitter
  • Google
  • Linkedin
  • Instagram
  • Pinterest
  • Youtube
Theme by Colorlib Powered by WordPress
Back to top