Skip to content
The Food Wife logo
  • Home
  • About
  • Blog
  • Contact

Category: Vegetarian

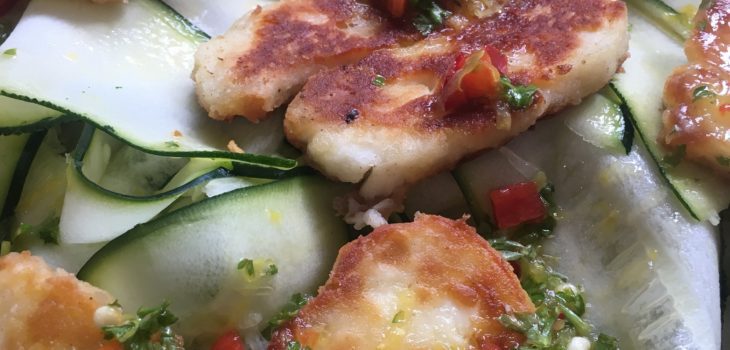
Halloumi and Courgette Salad with a Lemon and Chilli…

  • 12th May 201811th May 2018
  • by thefoodwife

Serves 3-4

Recently I’ve served Delia’s Fried Halloumi Cheese with Lime and Caper Vinaigrette for friends at lunch time. It’s a real favourite of mine in the summer as the dressing is so zingy it makes the cheese’s flavour really come alive. But this week I decided to come up with a recipe of my own that celebrates this wonderfully squeaky cheese. I was having a couple of friends over for lunch and had already decided to serve my Spiced Butternut Squash, Feta and Pomegranate Salad with flat breads on the side, but wanted another salad to accompany it.

I think raw courgette is fantastic in salads and it creates a lovely bed for the halloumi on this occasion. The dressing compliments both the courgette and the halloumi and is fresh with lemon and spiked with chilli to give a pleasing heat.

  • Ingredients:
  • For the salad:
  • 1 large courgette
  • 225g halloumi
  • 2 tbsp plain flour (gluten-free if required)
  • Salt and pepper
  • Olive oil for frying
  • For the dressing:
  • 1 unwaxed lemon (zest and juice)
  • 3 tbsp olive oil
  • 1 red chilli, finely diced (with or without seeds; if you leave them in then the result will be hotter)
  • 1 tbsp chopped parsley

Step 1: Using a vegetable peeler, peel the courgette into long strips (avoid using the core) and arrange on a large plate.

Step 2: Cut the halloumi into slices about half a centimetre thick, place between two sheets of kitchen paper and pat dry.

Step 3: Season the flour with a little salt and pepper and press the slices of cheese so they have a light coating of the flour.

Step 4: Heat 1-2 tbsp of olive oil in a non-stick frying pan on a medium-high heat, and fry the slices of floured halloumi for a couple of minutes on each side until golden brown. Remove and put on a sheet of kitchen paper to absorb any excess oil.

Step 5: Make the dressing by combining all of the ingredients in a jar with a lid and shaking until amalgamated; alternatively, whisk in a bowl.

Step 6: Arrange the fried halloumi over the strips of courgette and drizzle the dressing over the top (you may not want to use it all – I used about two thirds – the rest will store for a few days in the fridge).

Asian Noodle Peanut Salad

  • 8th May 20188th May 2018
  • by thefoodwife

Serves 2

Noodles, check. Peanuts, check. Chilli, check. Vegetables, check. What more could you want? Meat or fish? Simply serve some on the side with this versatile dish.

This salad is quick to put together and the dressing makes it so delicious, you’re sure to go back for seconds. With a few tweaks it can be both gluten-free and/or vegan by using gluten-free soy sauce and leaving out the fish sauce and replacing the honey with caster sugar.

I could happily eat this salad on its own, but we often have it as an accompaniment to some Thai curry-inspired fish cakes (which, luck would have it, are the focus of the next blog!).

  • Ingredients:
  • For the dressing:
  • 1 heaped tbsp crunchy peanut butter
  • 1 tbsp runny honey (or caster sugar if required)
  • 1 tbsp sweet chilli sauce
  • 2 tbsp light soy sauce (gluten-free if required)
  • 1 tsp fish sauce (optional – leave out for vegan/vegetarian)
  • Juice of 1 lime
  • 2 drops of sesame oil
  • For the salad:
  • 100g vermicelli rice noodles (or noodles of your choice)
  • A variety of salad ingredients, e.g. sliced red pepper, carrot ribbons, cucumber ribbons, sliced spring onion, salad leaves
  • Fresh herbs e.g. coriander

Step 1: Cook or soak the noodles as per the instructions on the packet. Drain and run cold water through them until they are cool.

Step 2: Combine all of the dressing ingredients in a large bowl. Mix thoroughly.

Step 3: Add the cold noodles and your chosen salad items to the dressing and toss to ensure everything is coated with the dressing.

I’ve also tried adding some fresh mango as part of the salad, which adds a lovely sweetness, so if you’re a fan of fruit in savoury dishes, why not give it a go!

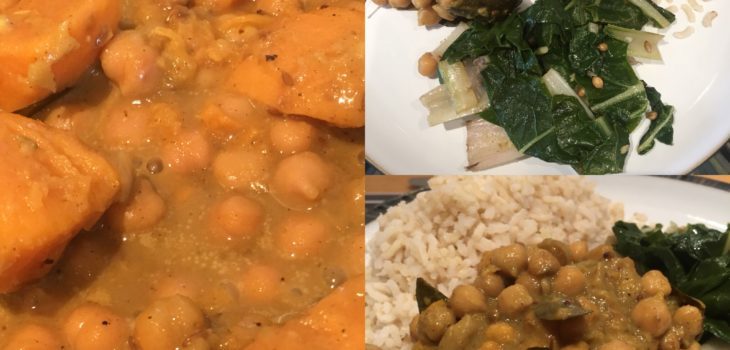
Sweet Potato and Chickpea Curry

  • 4th May 20184th May 2018
  • by thefoodwife

Serves 6

I’ve been sneakily trying to work more vegetarian recipes in to my husband’s diet, and this has become one of his favourites. It is so satisfying that I don’t think he realises he’s missed out on the meat! This recipe is actually vegan, gluten free and best of all, delicious. It is mild in heat but rich in spices and is pleasingly creamy, though lighter on calories due to the relatively small amount of coconut milk used.

Whilst this recipe serves 6, I will make a batch for the two of us and freeze two extra meals to enjoy later. I simply defrost in the fridge for 24 hours and gently reheat to serve.

I like to serve this with brown rice but it is also great as part of a thali (try it as a smaller portion with a daal, rice and a small side salad).

You will also find a version suitable for baby weaning on my website, here.

  • Ingredients:
  • 1 tbsp coconut oil (or oil of your choice)
  • 2 onions, diced
  • 2 garlic cloves, finely diced
  • 2 inch ginger, peeled and diced
  • 3 tsp cumin seeds (ground if you prefer)
  • 1 tsp mustard seeds (ground if you prefer)
  • 1 tsp ground turmeric
  • 2 tsp garam masala
  • 2 cloves
  • 8 cardamom
  • 2 pieces of cassia bark or cinnamon
  • 2 small handfuls of curry leaves
  • Small tin coconut milk (160ml)
  • 300ml vegetable stock
  • 3 sweet potatoes, peeled and cut into 1 inch cubes
  • 2 tins of drained chickpeas
  • Salt and pepper to taste

Step 1: Melt the coconut oil on a medium heat and add the diced onion, garlic and ginger. Soften for a couple of minutes and then add each of the spices, stirring to ensure they don’t burn.

Step 2: Add the small tin of coconut milk along with the vegetable stock (ensure you use a gluten free stock if you need to keep the curry suitable for those with a gluten intolerance/allergy).

Step 3: Add the cubed sweet potato and simmer until tender (this should take about 10 minutes).

Step 4: Five minutes before you are ready to serve the curry add the 2 tins of drained chickpeas to the pan, and heat through. Season as necessary (be aware that the stock you have used may well be salty enough).

This week I served it with some homegrown Swiss chard, roughly sliced and sweated in a little coconut oil with a crushed garlic clove, 1/4 tsp of dried chilli flakes, 1/2 tsp coriander seeds and 1/2 tsp of ground cumin seeds. Delicious.

Rhubarb Crumble Tray Bake

  • 2nd May 201820th August 2018
  • by thefoodwife

Makes 12 slices

I love rhubarb. I’m sure to choose anything on a menu that features this beautifully tart fruit. Last summer I had a few sticks sitting in my fridge and nothing quite did what I wanted it to from my recipe collection, so I started throwing some ingredients together, thinking about flavours and textures that just work, and came up with this moreish tray bake cake.

Last weekend I decided to make it again, and it was just as good as I remembered and so had to share it with you all.

Whilst it is delicious cold as a cake, it would also be equally pleasing served warm with hot custard as a pudding.

  • Ingredients:
  • For the tray bake:
  • 225g plain flour
  • 200g light brown sugar
  • 1 tbsp baking powder
  • 1 tsp vanilla extract
  • Zest of one orange
  • 1 tsp ground cinnamon
  • 4 eggs
  • 2 tbsp plain yoghurt
  • 125g melted butter, cooled
  • 300g chopped rhubarb (1 inch pieces)
  • For the crumble topping:
  • 50g melted butter
  • 75g light brown sugar
  • 100g oats

Step 1: Mix all of the traybake ingredients (minus the rhubarb) together in a large bowl, using a hand or electric whisk.

Step 2: Pour evenly into a greased traybake tin.

Step 3: Dot the top of the traybake with the chopped rhubarb.

Step 4: Combine the crumble topping ingredients in a bowl and sprinkle over the top of the rhubarb-studded tray bake.

Step 5: Place the tray bake in the oven for 35 mins at 180c and then for 20 mins at 150c.

Step 6: Remove from the oven and cool on a wire rack. Cut into 12 pieces.

I have successfully frozen this cake once it has been cut and individually wrapped in clingfilm and then sealed in a freezer bag.

Baby Weaning Ideas #1

  • 30th April 20181st May 2018
  • by thefoodwife

Here’s a little round up of what Austin has been enjoying over the last week… for anyone weaning their baby this might give you some new ideas. He approves of them all.

Cheesy scrambled egg

  • Ingredients:
  • Knob of butter
  • 1 large free range egg
  • Splash of full fat milk
  • Pinch of smoked paprika
  • 15g mature cheddar, grated

Step 1: Whisk the egg and milk together

Step 2: Melt the butter in a small saucepan on a medium low heat.

Step 3: Add the whisked egg to the pan and gently fold the cooked layers into the raw until it is a soft scrambled consistency.

Step 4: Add the paprika and grated cheese and fold through. Serve immediately.

Banana Yogurt with Cinnamon

  • Ingredients:
  • 1/3 banana
  • 3-4 heaped tea spoons of full fat Greek yogurt
  • A pinch of ground cinnamon

Step 1: Roughly mash the banana

Step 2: Add the Greek yogurt and cinnamon.

Step 3: Mix together until combined.

Sweet Potato and Coconut Curry

  • Ingredients:
  • 1 tsp coconut oil
  • 1/2 onion diced
  • 1/2 garlic clove finely diced
  • 1/2 inch ginger, peeled and diced
  • 1 tsp cumin seeds
  • 1/2 tsp mustard seeds
  • 1/2 tsp turmeric
  • 1/2 tsp garam masala
  • Pinch of curry leaves (optional)
  • 50ml coconut milk
  • 1 sweet potato peeled and cut into one-inch cubes

Step 1: Melt the coconut oil on a medium heat and add the diced onion, garlic and ginger. Soften for a couple of minutes and then add each of the spices, stirring to ensure they don’t burn.

Step 2: Add the cubed sweet potato and add the coconut milk along with enough water to just cover the potato.

Step 3: Simmer until tender (this should take about 10 minutes).

Step 4: Blend the mixture until smooth. Divide into portions.

If you have used whole spices these will remain but should be small enough not to cause an issue. I simply blend the curry leaves too but you may wish to omit them. I freeze this in portions and defrost it when needed. I’ve also added tinned chickpeas, lightly mashed with a fork to add more texture.

Posts pagination

Previous page 1 … 45 46 47 48 49 Next page

Newsletter

Blog Search

Blog Categories

  • Air fryer 2
  • Alcohol 12
  • Baby Weaning 24
  • Baking 74
  • Beef 18
  • Bread 1
  • Brunch 7
  • Cake 47
  • Chicken 48
  • Christmas 14
  • Cocktails 9
  • Dairy-Free 228
  • Dessert 37
  • Duck 1
  • Fish 12
  • Gluten-Free 254
  • Instant Pot 19
  • Lamb 6
  • Lunch box fillers 2
  • Ostrich 1
  • Pasta 4
  • Pescatarian 13
  • Pork 38
  • Rabbit 1
  • Salad 9
  • Shellfish 10
  • Soup 1
  • Turkey 10
  • Uncategorised 6
  • Vegan 136
  • Vegetarian 243

Socials

  • Facebook
  • Twitter
  • Google
  • Linkedin
  • Instagram
  • Pinterest
  • Youtube
Theme by Colorlib Powered by WordPress
Back to top